内容自定义
1 - 添加内容
现在你有了一个带有 Docsy 的新 Hugo 站点,是时候添加一些内容了!本页面告诉你如何使用主题来添加和组织站点内容。
内容根目录
你可以在你的 Hugo 站点项目的内容根目录下添加站点内容 - 即 content/ 或语言特定的根目录,比如 content/en/。这里的主要例外是你不想构建到站点中的静态文件:你可以在下面的添加静态内容中了解更多关于添加这些文件的位置。你的内容根目录中的文件通常按照站点章节和模板分组到子目录中,我们将在内容章节和模板中查看这些子目录。
你可以在目录结构解释中了解有关 Hugo 目录结构的更多信息。
内容章节和模板
Hugo 使用你提供的内容文件和站点主题提供的任何模板来构建你的站点页面。这些模板(在 Hugo 术语中称为"layouts(布局)")包括你的页面的页眉、页脚、导航和样式表链接:基本上除了页面的具体内容以外的一切。这些模板又可以由局部组成:用于页面元素(如页眉、搜索框等)的小型可重用 HTML 片段。
因为大多数技术文档站点有不同的章节来存放不同类型的内容,Docsy 主题提供了以下顶级站点章节的模板:
它还提供了一种默认的"着陆页"模板类型,带有站点页眉和页脚,但没有左侧导航,你可以用它来作为任何其他章节的模板。在这个站点和我们的示例站点中,它用于站点主页和About页面。
你站点中的每个顶级章节都对应着站点内容根目录中的一个目录。根据内容所在的文件夹,Hugo 自动应用适当的模板来渲染该章节。例如,此页面位于站点内容根目录 content/en/ 的 docs 子目录中,因此 Hugo 自动应用 docs 模板。你可以通过显式指定特定页面的模板或内容类型来覆盖此行为。
如果你复制了示例站点,则已经拥有适当命名的顶级章节目录来使用 Docsy 的模板,每个目录都有一个索引页面( _index.md 或 index.html)供用户访问。这些顶级章节也会出现在示例站点的顶级菜单中。
自定义章节
如果您复制了示例站点,但并不想使用提供的任何内容章节之一,只需删除相应的内容子目录即可。同样,如果您想添加一个顶级章节,只需添加一个新的子目录,但如果您想使用除默认模板之外的任何现有Docsy模板,则需要在每个页面的frontmatter中明确指定布局或内容类型。例如,如果您创建一个新目录content/en/amazing,并且希望该自定义章节中的一个或多个页面使用Docsy的docs模板,则在每个页面的前置元数据中添加type: docs:
+++
title = "My amazing new section"
weight = 1
type = "docs"
description = '''
A special section with a docs layout.
'''
+++
---
title: "My amazing new section"
weight: 1
type: docs
description: >
A special section with a docs layout
---{
"title": "My amazing new section",
"weight": 1,
"type": "docs",
"description": "A special section with a docs layout.\n"
} 或者,根据现有模板,在您项目的layouts目录中为您的新章节创建自己的页面模板。
您可以在Hugo模板中了解更多有关Hugo页面布局的工作原理。本页面的其余部分将告诉您如何添加内容并使用Docsy的每个模板。
替代站点结构
如上所述,默认情况下,您的站点具有主页(使用_default布局),/docs/下的文档章节,/blog/下的博客章节和/community/下的社区章节。每个章节的类型(确定其使用的布局)与其目录名称匹配。
在某些情况下,您可能希望具有不同的目录结构,但仍要利用Docsy的布局。一个常见的例子是"文档站点",其中大多数页面(包括主页)都使用文档布局,或者您可能更喜欢将/news/目录视为博客布局。
自Hugo 0.76以来,通过使用目标特定级联前置元数据,而不需要复制布局到您的站点或在每个页面上都指定type: blog,这已经变得可行。
例如,对于/news/章节,您可以在index 页面中指定以下前置元数据,这将更改该章节及其以下所有内容的类型为"blog":
+++
title = "Latest News"
linkTitle = "News"

[menu.main]
weight = 30

[[cascade]]
type = "blog"
+++
---
title: "Latest News"
linkTitle: "News"
menu:
main:
weight: 30
cascade:
- type: "blog"
---{
"title": "Latest News",
"linkTitle": "News",
"menu": {
"main": {
"weight": 30
}
},
"cascade": [
{
"type": "blog"
}
]
} 如果您想创建一个"docs"站点,则在顶级_index.md中指定类似以下内容将使所有顶级章节都被视为"文档",除了"news":
+++
title = "My Wonderful Site"

[[cascade]]
type = "blog"
toc_root = true

  [cascade._target]
  path = "/news/**"

[[cascade]]
type = "docs"

[cascade._target]
  path = "/**"
+++
---
title: "My Wonderful Site"
cascade:
- type: "blog"
toc_root: true
_target:
path: "/news/**"
- type: "docs"
_target:
path: "/**"
---{
"title": "My Wonderful Site",
"cascade": [
{
"type": "blog",
"toc_root": true,
"_target": {
"path": "/news/**"
}
},
{
"type": "docs",
"_target": {
"path": "/**"
}
}
]
}请注意,这里增加了toc_root。将其设置为true,可以使其被视为站点的单独部分,具有自己的左侧导航菜单。
使用此技术的示例基于文档的站点可在mostly docs repo中找到。
页面前置元数据
Hugo站点中的每个页面文件都有元数据前置元数据,告诉Hugo有关页面的信息。您可以在TOML、YAML或JSON中指定页面前置元数据(我们的示例站点和此站点使用YAML)。使用前置元数据指定页面标题、描述、创建日期、链接标题、模板、菜单权重,甚至包括页面使用的任何资源,如图像。您可以在前置元数据中查看可能的页面前置元数据的完整列表。
例如,这是本页面的前置元数据:
+++
title = "Adding Content"
linkTitle = "Adding Content"
weight = 1
description = '''
Add different types of content to your Docsy site.
'''
+++
---
title: "Adding Content"
linkTitle: "Adding Content"
weight: 1
description: >
Add different types of content to your Docsy site
---{
"title": "Adding Content",
"linkTitle": "Adding Content",
"weight": 1,
"description": "Add different types of content to your Docsy site.\n"
} 你需要提供的最基本的前置元数据是title(标题):其他的内容都由你决定!然而,如果你没有设置页面weight(权重),你的导航可能会有点混乱。你可能还想包括description,因为 Docsy 使用它来生成搜索引擎使用的mata description 标签。详见Search Engine Optimization (SEO) meta tags。
页面内容和标记
默认情况下,你可以像编写普通的 Markdown 或 HTML 文件一样,在 Docsy 站点上创建页面并添加frontmatter,就像上面描述的那样。从 0.100 版本开始,Goldmark是 Hugo 唯一支持的 Markdown 解析器。
Tip
如果你之前使用的是在 0.60 版本之前的 Hugo 版本,使用 [BlackFriday](https://github.com/russross/blackfriday) 作为 Markdown 解析器,你可能需要对你的站点进行一些小的更改才能与当前的 `Goldmark` Markdown 解析器一起工作。特别是,如果你克隆了我们的早期示例站点的一个版本,请在 `hugo.toml`/`hugo.yaml`/`hugo.json` 中添加以下内容,以允许 Goldmark 渲染原始 HTML 和 Markdown:[markup]
[markup.goldmark]
[markup.goldmark.renderer]
unsafe = truemarkup:
goldmark:
renderer:
unsafe: true{
"markup": {
"goldmark": {
"renderer": {
"unsafe": true
}
}
}
} 除了标记文本,你还可以使用 Hugo 和 Docsy 的 shortcodes(简码):可重用的 HTML 片段,可以快速构建你的页面。在 Docsy Shortcodes 中了解更多关于简码的内容。
Note
Hugo 也支持使用其他标记语言的外部解析器作为辅助工具来添加内容。例如,你可以使用rst2html 作为外部解析器来添加 RST 内容(尽管请注意,这不支持所有 RST 的变体,例如 Sphinx RST)。同样地,你可以使用 asciidoctor 来解析 Asciidoc 文件,或者使用 pandoc 解析其他格式的文件。
由于你需要安装外部解析器并运行 Hugo 来生成你的站点(例如,你将无法使用 Netlify 的持续部署功能),因此外部解析器可能并不适合与所有部署选项一起使用。此外,添加外部解析器可能会导致构建较大站点时出现性能问题。处理链接
Hugo 允许你使用普通的 Markdown 语法指定链接,但请记住,你需要将链接相对于你站点的根 URL 指定,而相对 URL 在你站点生成的 HTML 中不会被 Hugo 更改。
或者,你可以使用 Hugo 的 helper ref 和 relref 简码来创建解析为正确 URL 的内部链接。但是,请注意,如果用户在你生成的站点之外查看你的页面,例如在 GitHub 的 Web UI 中使用渲染的 Markdown 功能,那么你的链接将根本不会出现为链接。
你可以在 Hugo Tips 中找到(或添加!)有关处理 Hugo 链接的技巧和提示。
内容样式
我们不强制要求您的页面内容采用任何特定的风格。然而,如果您需要一些关于如何编写和格式化清晰、简洁的技术文档的指导,我们推荐使用Google开发者文档风格指南,特别是其中的风格指南要点。
页面 bundles
您可以将站点页面创建为其所在章节或子章节目录中的独立文件,或者作为包含内容的文件夹,其中内容在文件夹的index页中。为您的页面创建一个文件夹可以让您将图像和其他资源与内容捆绑(bundle)在一起。
您可以在本站点和我们的示例站点中看到这两种方法的示例。例如,本页面的源代码只是一个独立的文件/content/en/docs/adding-content.md。然而,在本站点中,Docsy简码的源代码位于Docsy Shortcodes,该页面使用的图像资源位于同一个/shortcodes/目录中。在Hugo术语中,这被称为叶子bundle,因为它是一个文件夹,包含了单个站点页面的所有数据,没有任何子页面(并且使用了不带下划线的index.md)。
您可以在页面Bundles中找到更多有关使用Hugo捆绑管理资源的信息。
Adding docs and blog posts
您最常使用的模板可能是docs模板(如本页面所使用的)或非常相似的blog 模板。这两个模板都包括:
- a left nav
- GitHub链接(从您的站点配置中获取)供读者编辑页面或创建问题
- a page menu
以及所有站点页面都使用的常见页头和页脚。应用哪个模板取决于您是否将内容添加到blog或docs内容目录中。您可以在导航和搜索中了解有关如何创建导航和页面菜单的更多信息。
组织您的文档
虽然Docsy的顶级章节允许您为不同类型的内容创建站点章节,但您可能还希望在docs章节内组织您的文档内容。例如,本站点的docs章节目录有多个子目录,用于入门、内容和自定义等。每个子目录都有一个_index.md(也可以是_index.html),它作为一个章节索引页,告诉Hugo相关目录是您的文档的子章节。
Docsy的docs布局为您提供了一个左侧导航窗格,其中包含根据您的文档文件结构自动生成的嵌套菜单。在docs/目录中的每个独立页面或子章节_index.md或_index.html页面都会获得一个顶级菜单项,使用页面或index中的链接名称和weight元数据。
要向子章节添加文档,只需将页面文件添加到相应的子目录中。除子章节索引页面外,您添加到子章节的任何页面都将出现在子菜单中(请查看左侧以查看实际效果!),并按页面weight排序。在导航和搜索中了解有关添加Docsy导航元数据的更多信息。
如果您已经复制了示例站点,则在您的docs目录中已经有一些建议的子目录,并提供了放置何种类型内容以及一些示例Markdown页面的指导。您可以在组织您的内容中了解更多关于使用Docsy组织内容的信息。
文档章节着陆页面
默认情况下,文档章节着陆页(位于章节目录中的_index.md或_index.html)使用一种布局,该布局添加了一个格式化的链接列表,其中包含章节中的页面及其前置元数据描述。本站点中的内容和自定义着陆页面是一个很好的例子。
要显示一个简单的链接条目列表,指定在着陆页面的前置元数据中simple_list: true:
+++
title = "Simple List Page"
simple_list = true
weight = 20
+++
---
title: "Simple List Page"
simple_list: true
weight: 20
---{
"title": "Simple List Page",
"simple_list": true,
"weight": 20
}To display no links at all, specify no_list: true in the landing page’s frontmatter:
+++
title = "No List Page"
no_list = true
weight = 20
+++
---
title: "No List Page"
no_list: true
weight: 20
---{
"title": "No List Page",
"no_list": true,
"weight": 20
}组织您的博客文章
Docsy的blog布局也为您提供了一个左侧导航菜单(如docs布局),以及应用于/blog/_index.md的列表类型index 页,自动按反向时间顺序显示所有最新文章的片段。
要创建不同的博客类别以组织您的文章,请在blog/中创建子文件夹。例如,在我们的示例站点中,我们有news和releases。每个类别都需要有自己的_index.md或_index.html着陆页面文件,指定类别标题以使其在左侧导航和顶级博客着陆页面上正确显示。这是releases的index 页面:
+++
title = "New Releases"
linkTitle = "Releases"
weight = 20
+++
---
title: "New Releases"
linkTitle: "Releases"
weight: 20
---{
"title": "New Releases",
"linkTitle": "Releases",
"weight": 20
}To add author and date information to blog posts, add them to the page frontmatter:
+++
date = 2018-10-06T00:00:00.000Z
title = "Easy documentation with Docsy"
linkTitle = "Announcing Docsy"
description = "The Docsy Hugo theme lets project maintainers and contributors focus on content, not on reinventing a website infrastructure from scratch"
author = "Riona MacNamara"

[[resources]]
src = "**.{png,jpg}"
title = "Image #:counter"

[resources.params]
  byline = "Photo: Riona MacNamara / CC-BY-CA"
+++
---
date: 2018-10-06
title: "Easy documentation with Docsy"
linkTitle: "Announcing Docsy"
description: "The Docsy Hugo theme lets project maintainers and contributors focus on content, not on reinventing a website infrastructure from scratch"
author: Riona MacNamara
resources:
- src: "**.{png,jpg}"
title: "Image #:counter"
params:
byline: "Photo: Riona MacNamara / CC-BY-CA"
---{
"date": "2018-10-06T00:00:00.000Z",
"title": "Easy documentation with Docsy",
"linkTitle": "Announcing Docsy",
"description": "The Docsy Hugo theme lets project maintainers and contributors focus on content, not on reinventing a website infrastructure from scratch",
"author": "Riona MacNamara",
"resources": [
{
"src": "**.{png,jpg}",
"title": "Image #:counter",
"params": {
"byline": "Photo: Riona MacNamara / CC-BY-CA"
}
}
]
} 如果您已经复制了示例站点,并且不想要blog 章节,或者想链接到外部博客,只需删除blog子目录即可。
使用顶级着陆页面
Docsy的默认页面模板没有左侧导航,适用于为您的站点或其他"着陆"类型页面创建主页。
自定义示例站点页面
如果你已经复制了示例站点,那么在 content/en/_index.html 文件中你已经有了一个简单的站点着陆页。它由 Docsy 提供的 Hugo shortcode page blocks组成。
要自定义大的着陆图片(在一个封面(cover)块中),请将项目中的 content/en/featured-background.jpg 文件替换为你自己的图片(文件名中必须包含background),你可以添加或删除尽可能多的块,以及添加你自己的内容。
示例站点还有一个About 页面,在 content/en/about/_index.html 中使用相同的 Docsy 模板。同样,它由page blocks组成,包括 content/en/about/featured-background.jpg 中的另一个背景图片。与站点着陆页一样,你可以替换图片、删除或添加块,或者添加你自己的内容。
构建你自己的着陆页
如果你刚刚使用了这个主题,你仍然可以使用所有 Docsy 提供的 page blocks(或任何其他你想要的内容)在相同的文件位置构建自己的着陆页。
添加community 页面
community着陆页模板有样板内容,自动填充项目名称和在 hugo.toml/hugo.yaml/hugo.json 中指定的社区链接,为你的用户提供快速访问资源的链接,帮助他们参与你的项目。同样的链接也默认添加到你的站点页脚。
Configuration file:
[params.links]

# End user relevant links. These will show up on left side of footer and in the community page if you have one

[[params.links.user]]
 name = "User mailing list"
 url = "<https://example.org/mail>"
 icon = "fa fa-envelope"
        desc = "Discussion and help from your fellow users"
[[params.links.user]]
 name ="Twitter"
 url = "<https://example.org/twitter>"
 icon = "fab fa-x-twitter"
        desc = "Follow us on Twitter to get the latest news!"
[[params.links.user]]
 name = "Stack Overflow"
 url = "<https://example.org/stack>"
 icon = "fab fa-stack-overflow"
        desc = "Practical questions and curated answers"

# Developer relevant links. These will show up on right side of footer and in the community page if you have one

[[params.links.developer]]
 name = "GitHub"
 url = "<https://github.com/google/docsy>"
 icon = "fab fa-github"
        desc = "Development takes place here!"
[[params.links.developer]]
 name = "Slack"
 url = "<https://example.org/slack>"
 icon = "fab fa-slack"
        desc = "Chat with other project developers"
[[params.links.developer]]
 name = "Developer mailing list"
 url = "<https://example.org/mail>"
 icon = "fa fa-envelope"
desc = "Discuss development issues around the project"params:
links:
user:
- name: User mailing list
url: '<https://example.org/mail>'
icon: fa fa-envelope
desc: Discussion and help from your fellow users
- name: Twitter
url: '<https://example.org/twitter>'
icon: fab fa-x-twitter
desc: Follow us on Twitter to get the latest news!
- name: Stack Overflow
url: '<https://example.org/stack>'
icon: fab fa-stack-overflow
desc: Practical questions and curated answers
developer:
- name: GitHub
url: '<https://github.com/google/docsy>'
icon: fab fa-github
desc: Development takes place here!
- name: Slack
url: '<https://example.org/slack>'
icon: fab fa-slack
desc: Chat with other project developers
- name: Developer mailing list
url: '<https://example.org/mail>'
icon: fa fa-envelope
desc: Discuss development issues around the project{
"params": {
"links": {
"user": [
{
"name": "User mailing list",
"url": "https://example.org/mail",
"icon": "fa fa-envelope",
"desc": "Discussion and help from your fellow users"
},
{
"name": "Twitter",
"url": "https://example.org/twitter",
"icon": "fa-brands fa-x-twitter",
"desc": "Follow us on Twitter to get the latest news!"
},
{
"name": "Stack Overflow",
"url": "https://example.org/stack",
"icon": "fa-brands fa-stack-overflow",
"desc": "Practical questions and curated answers"
}
],
"developer": [
{
"name": "GitHub",
"url": "https://github.com/google/docsy",
"icon": "fa-brands fa-github",
"desc": "Development takes place here!"
},
{
"name": "Slack",
"url": "https://example.org/slack",
"icon": "fa-brands fa-slack",
"desc": "Chat with other project developers"
},
{
"name": "Developer mailing list",
"url": "https://example.org/mail",
"icon": "fa fa-envelope",
"desc": "Discuss development issues around the project"
}
]
}
}
} 如果你正在创建自己的站点,想要使用这个模板添加页面,请在你的内容根目录中添加一个 /community/_index.md 文件。如果你复制了示例站点,并不想要一个社区页面,请在项目存储库中删除 /content/en/community/ 目录。
添加静态内容
你可能想要将一些非 Hugo 构建的内容与你的站点一起提供:例如,如果你使用 Doxygen、Javadoc 或其他文档生成工具生成参考文档。
要添加静态内容以"原样(as-is)“提供,请在站点的 static 目录中添加文件夹和/或文件。在部署站点时,该目录中的内容将在站点根路径下提供服务。因此,例如,如果你在 /static/reference/cpp/ 添加了内容,用户可以在 http://{server-url}/reference/cpp/ 访问该内容,你可以从其他页面在 /reference/cpp/{file name} 上链接到该目录中的页面。
你还可以在该目录中使用你的项目使用的其他文件,包括图像文件。你可以在静态文件中了解更多关于提供静态文件的信息,包括配置多个静态内容目录。
RSS 订阅
Hugo 默认会为主页和任何章节创建一个 RSS 订阅。对于主 RSS 订阅,你可以通过设置 hugo.toml/hugo.yaml/hugo.json 中的站点参数来控制包含哪些章节。这是默认配置:
[params]
rss_sections = ["blog"]params:
rss_sections: [blog]{
"params": {
"rss_sections": [
"blog"
]
}
}To disable all RSS feeds, add the following to your hugo.toml/hugo.yaml/hugo.json:
[params]
disableKinds = ["RSS"]params:
disableKinds: [RSS]{
"params": {
"disableKinds": [
"RSS"
]
}
}Note
> > 如果您已启用我们的[打印功能](/docs/adding-content/print/)或以其他方式在`hugo.toml`/`hugo.yaml`/`hugo.json`中指定了章节级别的输出格式,请确保"RSS"被列为输出格式,否则您将无法获得章节级别的RSS订阅(并且您的博客章节将不会有漂亮的橙色RSS按钮)。您的`hugo.toml`/`hugo.yaml`/`hugo.json` 规范将覆盖Hugo用于章节的默认[输出格式](https://gohugo.io/templates/output-formats/),这些格式为HTML和RSS。[outputs]
section = [ "HTML", "RSS", "print" ]outputs:
section:
- HTML
- RSS
- print{
"outputs": {
"section": [
"HTML",
"RSS",
"print"
]
}
}Sitemap
Hugo默认为您的生成站点创建sitemap.xml文件:例如,这是本站的sitemap。
您可以在hugo.toml/hugo.yaml/hugo.json中配置您的sitemap更新频率、sitemap文件名和默认页面优先级:
[sitemap]
changefreq = "monthly"
filename = "sitemap.xml"
priority = 0.5sitemap:
changefreq: monthly
filename: sitemap.xml
priority: 0.5{
"sitemap": {
"changefreq": "monthly",
"filename": "sitemap.xml",
"priority": 0.5
}
}To override any of these values for a given page, specify it in page frontmatter:
+++
title = "Adding Content"
linkTitle = "Adding Content"
weight = 1
description = '''
Add different types of content to your Docsy site.
'''
[sitemap]
priority = 1
+++---
title: "Adding Content"
linkTitle: "Adding Content"
weight: 1
description: >
Add different types of content to your Docsy site.
sitemap:
priority: 1.0
---{
"title": "Adding Content",
"linkTitle": "Adding Content",
"weight": 1,
"description": "Add different types of content to your Docsy site.\n",
"sitemap": {
"priority": 1
}
} 要了解有关配置站点地图的更多信息,请参阅Sitemap模板。
2 - 颜色与字体
默认情况下,使用 Docsy 的站点具有主题的默认字体、颜色和一般外观和感受。然而,如果您想要自己的颜色方案(您可能会想要!),您可以使用自己项目特定的值非常容易地覆盖主题默认值——Hugo 在查找构建您的站点的信息时将首先查找您的项目文件。并且,由于 Docsy 使用 Bootstrap 4 和 SCSS 进行样式化,您可以在其特殊的 SCSS 项目变量文件中仅覆盖单个值(如项目颜色和字体),或通过创建自己的样式进行更进一步的定制。
Docsy 还提供了使用 Chroma 或 Prism 进行高亮显示代码块的选项。
项目样式文件
要自定义项目的外观和感受,请创建以下任一 Docsy 占位符文件的您自己的版本(注意下划线后缀 _project.scss):
assets/scss/_variables_project.scss是您添加项目特定的主题变量定义(如站点颜色)以及您想要设置的任何其他 Bootstrap 变量值的地方。您可以在assets/scss/_variables.scss中找到 Docsy 主题变量及其默认值的列表。有关其他 Bootstrap 4 变量的信息,请参见变量默认值和 Bootstrap 的 v4-dev/scss/_variables.scss 文件。assets/scss/_styles_project.scss是您可以添加自己的自定义 SCSS 样式的地方,包括覆盖 Docsy 主题 SCSS 文件中的任何样式。
Tip
在服务器模式下运行时未启用 PostCSS(CSS 浏览器前缀自动添加)(速度较慢),因此 Chrome 是推荐的开发选择。颜色和主题颜色
站点颜色
要自定义站点的颜色,请将 SCSS 变量覆盖添加到**‘assets/scss/_variables_project.scss’**。例如,您可以设置主和辅助站点颜色如下:
$primary: #390040;
$secondary: #a23b72;
Docsy 具有 Bootstrap 功能,例如渐变背景(’$enable-gradients’) 和阴影 (’$enable-shadows’) 默认启用。这些也可以通过将变量设置为’假’。
要向 Bootstrap 的 [颜色映射表] 添加颜色或修改颜色,请使用 ‘assets/scss/_variables_project_after_bs.scss’。 例如:
$custom-colors: (
'my-favorite-color': purple,
'my-other-color': pink,
);
$theme-colors: map-merge($theme-colors, $custom-colors);
Learn how to modify maps, 请参阅 [Maps and loops] and [Adding theme colors].
[添加主题颜色]: https://getbootstrap.com/docs/5.3/customize/color-modes/#adding-theme-colors [彩色地图]:https://getbootstrap.com/docs/5.3/customize/color/#color-sass-maps [地图和循环]: https://getbootstrap.com/docs/5.3/customize/sass/#maps-and-loops [变量默认值]: https://getbootstrap.com/docs/5.3/customize/sass/#variable-defaults
Light/dark color themes
Docsy 0.10.0 支持浅色和 [深色模式] 颜色主题。允许您的网站用户选择浅色/深色模式,请启用 Docsy [浅色/深色菜单]** 或创建您自己的自定义主题选择器。
如果您的网站使用 [色度高亮显示代码],则需要执行额外的步骤因此,代码块样式与浅色/深色模式兼容:
- 确保项目配置中的“markup.highlight.noClasses”为“false”。 有关此选项的详细内容,请参阅[生成语法荧光笔CSS]。
- 将 ‘@import ’td/code-dark’’ 添加到项目的 [’_styles_project.scss’] 文件中。
有关详细信息,请参阅[代码突出显示的色度]。
Note
Light/dark color themes, only affect documentation pages, and white blocks shortcodes.[代码高亮的色度]:#code-highlighting-with-chroma [浅色/深色菜单]:#lightdark 模式菜单 [生成语法突出显示CSS]: https://gohugo.io/content-management/syntax-highlighting/#generate-syntax-highlighter-css
字体
该主题使用Open Sans 作为其主要字体。要禁用 Google Fonts 并使用系统字体,请在 assets/scss/_variables_project.scss 中设置此 SCSS 变量:
$td-enable-google-fonts: false;
要配置其他 Google 字体:
$google_font_name: 'Open Sans';
$google_font_family: 'Open+Sans:300,300i,400,400i,700,700i';
请注意,如果您决定选择具有不同权重的字体(在内置配置中,这是 300 (light), 400 (medium) and 700 (bold)),您还需要调整与权重相关的变量,即以 $font-weight- 开头的变量。
CSS 实用程序
有关可用 CSS 实用程序类的文档,请参见 Bootstrap 文档。这个主题在这个领域自己添加的很少。但是,我们添加了一些颜色状态的 CSS 类,这些类在动态上下文中可能会很有用:
.-bg-<color>.-text-<color>
例如,当您不知道primary色是暗色还是亮色时,您可以使用这些类将文本样式为适当的颜色,以确保正确的颜色对比度。当您收到颜色代码作为shortcode参数时,它们也很有用。
<color> 的值可以是任何颜色名称,例如 primary、white、dark、warning、light、success、300、blue、orange 等。
当您使用 .-bg-<color> 时,文本颜色将调整以获得适当的对比度:
<div class="-bg-primary p-3 display-4">Background: Primary</div>
<div class="-bg-200 p-3 display-4">Background: Gray 200</div>
To only set the text color use .-text-<color>:
<div class="-text-blue pt-3 display-6">Text: Blue</div>
使用Chroma进行代码高亮
Hugo’s default Chroma style is [monokai]. To use another style, such as [tango], add the following to your project configuration:
[markup]
[markup.highlight]
style = "tango"markup:
highlight:
style: tango{
"markup": {
"highlight": {
"style": "tango"
}
}
}有关可用样式的完整列表,请参阅 [色度样式库]。
[色度风格库]:https://xyproto.github.io/splash/docs/ [monokai]:https://xyproto.github.io/splash/docs/monokai.html [OneDark]:https://xyproto.github.io/splash/docs/onedark.html [语法突出显示]: https://gohugo.io/content-management/syntax-highlighting/ [探戈]:https://xyproto.github.io/splash/docs/tango.html
浅色/深色代码样式
Docsy的默认色度样式 light/dark mode are:
- [tango] for light mode
- [onedark] for dark mode
如果您想使用其他样式,请将 [Hugo 生成的色度样式] 保存到相应的文件:
没有指定语言的代码块
默认情况下,突出显示不会应用于没有指定语言。如果您希望将代码突出显示应用于 all 代码块,即使没有语言,也可以将“markup.highlight.guessSyntax”设置为“true”项目的配置文件。
复制到剪贴板
如果您使用的是 Docsy 0.6.0 或更高版本,代码块会显示“复制到剪贴板”右上角的按钮。要禁用此功能,请将配置文件中的“disable_click2copy_chroma”更改为“true”:
使用 Prism 突出显示代码
或者,您可以在’hugo.toml’/‘hugo.yaml’/‘hugo.json’:
[params]
prism_syntax_highlighting = trueparams:
prism_syntax_highlighting: true{
"params": {
"prism_syntax_highlighting": true
}
}启用此选项后,您的站点将使用 [棱镜](https://prismjs.com/index.html) 代替 Chroma 作为代码块突出。
Prism 是一种流行的开源语法高亮显示,支持 200 多种 [语言](https://prismjs.com/index.html#supported-languages)和各种 [插件](https://prismjs.com/index.html#plugins)。
Docsy 包含用于基本 Prism 配置的 JavaScript 和 CSS 文件,其中支持:
- 使用 Prism “Default”主题设置样式的代码块
- 复制到代码块上的剪贴板按钮
- 多种常用语言的语法高亮显示,如按照 Prism 下载链接,[自定义您的下载][prismjs-download+]。
没有语言的代码块
默认情况下,Prism 代码突出显示样式不应用于代码块如果没有指定的语言,你会得到 Docsy 的默认灰色样式黑色文本。将 Prism 样式应用于没有语言或有语言的代码块Prism 不支持,请在三元组后指定“none”作为语言反引号。
为其他语言或插件扩展 Prism
如果随附的棱镜配置不足以满足您的要求,并且您想使用其他语言或插件,您可以替换包含的文件。
- 下载您自己的 Prism JS 和 CSS 文件 https://prismjs.com/download.html
- 将包含的 Prism JS 和 CSS 替换为您下载的文件:
- 将 Javascript 文件复制到 ‘static/js/prism.js’
- 将 CSS 文件复制到 ‘static/css/prism.css’
导航栏
设置项目徽标和名称的样式
默认的 Docsy 导航栏 (’.td-navbar’) 显示您的站点标识,包括以下各项:
为确保您的徽标正确显示,您可能需要调整其大小并确保它没有高度和宽度属性,因此其大小是完全的响应。[覆盖默认样式][项目样式] 的 ‘.td-navbar .navbar-brand svg’ 或(等效) ‘.td-navbar .navbar-brand__logo’(.td-navbar .navbar-’)。
您的项目名称,即网站“标题”。如果你不想要你的项目要显示的名称(例如,因为您的徽标是或包含 [文字商标][]),然后将以下自定义样式添加到 [项目的styles][项目样式]:
.td-navbar .navbar-brand__name { display: none; }
浅色/深色模式菜单
如果启用此功能,Docsy 会在导航栏中添加一个菜单,让用户在默认的“轻量级”模式之间切换您网站的文档页面显示,以及“深色”模式,其中文本在深色上以浅色显示背景。
若要在导航栏中启用浅色/[深色模式]菜单的显示,请设置“params.ui.showLightDarkModeMenu”在项目的配置文件中设置为“true”。下拉菜单显示在右,紧挨着 [搜索框](如果存在)。
[params]
[params.ui]
showLightDarkModeMenu = trueparams:
ui:
showLightDarkModeMenu: true{
"params": {
"ui": {
"showLightDarkModeMenu": true
}
}
}半透明封面图像
对于包含 blocks/cover 短代码的页面,与大多数主页一样,导航栏是半透明的,只要主图没有向上滚动到导航栏。有关示例,请参阅 [关于 Docsy][] 页面。这个初始半透明设置确保主图像的最大可见度。
主图滚动过导航栏后,导航栏的(不透明)背景颜色被设置为 – 通常设置为网站的 [原色][]。
使用某些英雄图像,导航栏条目的文本可能难以阅读。在在这些情况下,您可以通过设置“params.ui.navbar_translucent_over_cover_disable”选项更改为“true”站点的 [配置文件][]。
表格
Docsy通过类’.td-table’将以下样式应用于所有表:
- Bootstrap table styles:
.table.table-striped.table-responsive
display: block, which is necessary for tables to be responsive.
此样式配置为您提供仅使用 Markdown 的响应式表,无需将表包裹在“
Note
Our table styling goes against the Bootstrap recommendation to wrap tables with.table-responsive — however, we think letting
users create responsive tables with just Markdown table syntax is more
convenient.要渲染没有 Docsy 样式的表,请将 ‘.td-initial’ 类应用于桌子。从生成的“
| Shape | Number of sides |
|---|---|
| Triangle | 3 |
| Square | 4 |
自定义模板
在头部或正文末端之前添加代码
如果您需要添加一些代码(CSS 导入、cookie 同意或类似代码)到在每一页的“head”部分,将“head-end.html”部分添加到您的项目中:
layouts/partials/hooks/head-end.html
并在该文件中添加所需的代码。您的部分代码是自动的在主题部分结束之前包括在内
head.html.
主题版本
head-end.html
是空的。
同样,如果您想在“body”结束之前添加一些代码,请创建您的以下文件的自己的版本:
layouts/partials/hooks/body-end.html
此文件中的任何代码都会自动包含在主题部分的末尾
scripts.html.
然后,“head.html”和“scripts.html”都用于构建 Docsy’s
所有其他页面模板都使用:
<!doctype html>
<html lang="{{ .Site.Language.Lang }}" class="no-js">
<head>
{{ partial "head.html" . }}
</head>
<body class="td-{{ .Kind }}">
<header>
{{ partial "navbar.html" . }}
</header>
<div class="container-fluid td-default td-outer">
<main role="main" class="td-main">
{{ block "main" . }}{{ end }}
</main>
{{ partial "footer.html" . }}
</div>
{{ partialCached "scripts.html" . }}
</body>
</html>
3 - 导航和菜单
Docsy为您的网站提供了多种内置导航功能,包括网站菜单、分区菜单和页面菜单。本页向您展示它们的工作原理,以及如何配置和自定义它们以满足您的需求。
顶层菜单
顶层菜单(出现在整个站点的顶部导航栏中)使用您站点的主菜单(main menu)。所有的 Hugo 站点都有一个主菜单(main menu)项数组,可以通过 .Site.Menus 站点变量进行访问,通过页面前置元数据或您站点的 hugo.toml/hugo.yaml/hugo.json 进行填充。
要将页面或章节添加到此菜单中,请将其添加到站点的主菜单(main menu)中,无论是在 hugo.toml/hugo.yaml/hugo.json 中还是在目标页面的前置元数据中(在 _index.md 或_index.html 中作为章节着陆页面)。例如,这里是我们如何将 Documentation 章节着陆页添加到该站点的主菜单中的示例:
+++
title = "Welcome to Docsy"
linkTitle = "Documentation"
[menu.main]
weight = 20
pre = "<i class='fa-solid fa-book'></i>"
+++---
title: "Welcome to Docsy"
linkTitle: "Documentation"
menu:
main:
weight: 20
pre: <i class='fa-solid fa-book'></i>
---{
"title": "Welcome to Docsy",
"linkTitle": "Documentation",
"menu": {
"main": {
"weight": 20,
"pre": "<i class='fa-solid fa-book'></i>"
}
}
} 该菜单按页面weight从左到右排序。例如,页面weight: 30 的章节索引或页面将出现在菜单中的 Documentation 章节之后,而weight: 10的页面将出现在它之前。
如果要将外部站点的链接添加到此菜单中,请在 hugo.toml/hugo.yaml/hugo.json 中添加,指定weight。
[[menu.main]]
name = "GitHub"
weight = 50
url = "https://github.com/google/docsy/"menu:
main:
- name: GitHub
weight: 50
url: 'https://github.com/google/docsy/'{
"menu": {
"main": [
{
"name": "GitHub",
"weight": 50,
"url": "https://github.com/google/docsy/"
}
]
}
}将图标添加到顶层菜单
如 Hugo 文档中所述,您可以使用站点的 hugo.toml/hugo.yaml/hugo.json 或页面前置元数据中定义的主菜单项的 pre 和/或 post 参数为顶层菜单项添加图标。例如,以下配置将 GitHub 图标添加到 GitHub 菜单项,并添加 New! 警报以指示这是菜单的新添加。
[[menu.main]]
name = "GitHub"
weight = 50
url = "https://github.com/google/docsy/"
pre = "<i class='fa-brands fa-github'></i>"
post = "<span class='alert'>New!</span>"menu:
main:
- name: GitHub
weight: 50
url: 'https://github.com/google/docsy/'
pre: <i class='fa-brands fa-github'></i>
post: <span class='alert'>New!</span>{
"menu": {
"main": [
{
"name": "GitHub",
"weight": 50,
"url": "https://github.com/google/docsy/",
"pre": "<i class='fa-brands fa-github'></i>",
"post": "<span class='alert'>New!</span>"
}
]
}
} 您可以在FontAwesome文档中找到完整的图标列表。Docsy主题默认包含免费的FontAwesome图标。
添加版本下拉菜单
如果在hugo.toml中添加了一些[params.versions],Docsy主题将在顶级菜单中添加一个版本选择器下拉菜单。
您可以在versioning your docs中了解更多信息。
添加语言下拉菜单
如果在hugo.toml中配置了多种语言,Docsy主题将在顶级菜单中添加一个语言选择器下拉菜单。选择语言将带用户到当前页面的翻译版本,或给定语言的主页。
您可以在 Multi-language support中了解更多信息。
章节菜单
章节菜单位于docs章节的左侧,自动从content树中构建。与顶级菜单一样,按页面或章节索引weight(或按页面创建date,如果未设置weight)排序,页面或索引的title或linkTitle(如果不同)作为菜单中的链接标题。如果一个章节子文件夹除了_index.md或_index.html之外还有其他页面,那么这些页面将作为子菜单出现,再次按weight排序。例如,这是这个页面的元数据,显示它的weight和title:
+++
title = "Navigation and Search"
linkTitle = "Navigation and Search"
date = 2017-01-05T00:00:00.000Z
weight = 3
description = '''
Customize site navigation and search for your Docsy site.
'''
+++---
title: "Navigation and Search"
linkTitle: "Navigation and Search"
date: 2017-01-05
weight: 3
description: >
Customize site navigation and search for your Docsy site.
---{
"title": "Navigation and Search",
"linkTitle": "Navigation and Search",
"date": "2017-01-05T00:00:00.000Z",
"weight": 3,
"description": "Customize site navigation and search for your Docsy site.\n"
} 要从左侧导航菜单中隐藏页面或章节,请在前置元数据中设置toc_hide: true。
要从 docs section landing page的章节摘要中隐藏一个页面,请在该页面的前置元数据中设置hide_summary: true。如果您想从目录菜单和章节摘要列表中隐藏一个页面,您需要在该页面的前置元数据中将toc_hide和hide_summary都设置为true。
+++
title = "My Hidden Page"
weight = 99
toc_hide = true
hide_summary = true
description = '''
Page hidden from both the TOC menu and the section summary list.
'''
+++---
title: "My Hidden Page"
weight: 99
toc_hide: true
hide_summary: true
description: >
Page hidden from both the TOC menu and the section summary list.
---{
"title": "My Hidden Page",
"weight": 99,
"toc_hide": true,
"hide_summary": true,
"description": "Page hidden from both the TOC menu and the section summary list.\n"
}章节菜单选项
默认情况下,章节菜单完全展开显示当前章节。对于大型站点,这可能会使左侧导航过长,难以扫描。尝试在hugo.toml中设置站点参数ui.sidebar_menu_compact = true。
使用紧凑菜单(.ui.sidebar_menu_compact = true),只显示当前页面的祖先、同级和直接后代。您可以使用可选参数.ui.ul_show来设置所需的菜单深度始终可见。例如,使用.ui.ul_show = 1将始终显示第一级菜单。
除了完全展开和紧凑的菜单选项,您还可以通过在hugo.toml中设置站点参数ui.sidebar_menu_foldable = true来创建折叠菜单。折叠菜单让用户通过在菜单中的父节点旁边切换箭头图标来展开和折叠该菜单章节。
在大型站点上(默认情况下:>2000页),该章节菜单不会为每个页面生成,而是为整个章节进行缓存。然后使用JS设置标记活动菜单项(和菜单路径)的HTML类。您可以使用可选参数.ui.sidebar_cache_limit调整激活缓存的章节菜单的限制。
下面的选项卡窗格列出了您可以在项目配置文件中定义的菜单章节选项。
[params.ui]
sidebar_menu_compact = true
ul_show = 1
sidebar_menu_foldable = true
sidebar_cache_limit = 1000params:
ui:
sidebar_menu_compact: true
ul_show: 1
sidebar_menu_foldable: true
sidebar_cache_limit: 1000{
"params": {
"ui": {
"sidebar_menu_compact": true,
"ul_show": 1,
"sidebar_menu_foldable": true,
"sidebar_cache_limit": 1000,
}
}
}向章节菜单添加图标
您可以通过在页面前置元数据中设置icon参数(例如icon: fa-solid fa-screwdriver-wrench)向侧边栏中的章节菜单添加图标。
您可以在FontAwesome文档中找到要使用的所有图标的完整列表。Docsy默认包含免费的FontAwesome图标。
开箱即用,如果您想使用图标,您应该为同一菜单级别上的所有项定义图标,以确保适当的外观。如果该图标以不同的方式使用,则可能需要进行个别CSS调整。
向章节菜单添加手动链接
默认情况下,章节菜单完全是从您的章节页面生成的。如果您想在此菜单中添加手动链接,例如链接到外部站点或你站点中的不同章节中的页面,则可以通过在doc层次结构中创建具有适当权重和一些特殊参数的占位符页面文件(frontmatter)来实现这一点,以指定链接详细信息。
要创建占位符页面,请按通常方式在要在该菜单中显示链接的目录中创建一个页面文件,并将manualLink参数添加到其元数据中。如果一个页面在其元数据中具有manualLink,则Docsy会为此页面在章节菜单和章节索引中(章节在着陆页面上的子页面列表中 —— 请参见description in the Docsy docs)生成链接,但该链接目标会被替换为manualLink的值。该链接文本是您的占位符页面的title(如果设置了linkTitle,则是linkTitle)。您还可以使用manualLinkTitle参数设置链接的title属性以及使用manualLinkTarget设置链接目标 —— 例如,如果您希望一个外部链接在新选项卡中打开,则可以将其链接目标设置为_blank。Docsy会自动将rel=noopener添加到打开新标签页的链接中,作为安全最佳实践。
您还可以使用manualLink将其他现有站点页面的附加交叉引用添加到站点中。对于内部链接,您可以选择使用manualLinkRelref参数而不是manualLink来使用内置的Hugo函数relref。如果relref无法在您的站点中找到唯一页面,则Hugo会抛出错误消息。
Note
尽管基于您的占位符文件生成的所有菜单和着陆页链接都根据参数manualLink 或 manualLinkRelref 设置,但 Hugo 仍会为该文件生成一个常规的 HTML 站点页面,尽管没有生成的链接指向该页面。为避免用户意外着陆到生成的占位符页面时产生混淆,我们建议在该页面的正常内容和/或页面描述中指定外部链接的 URL。面包屑导航
默认情况下,面包屑导航链接出现在每个页面的顶部。要禁用面包屑导航,请在hugo.toml中设置站点参数ui.breadcrumb_disable = true。
分类结果页面上的每个项(例如,单击一个分类标签,例如:标签/类别)也会显示面包屑导航链接。可以通过在hugo.toml中设置站点参数ui.taxonomy_breadcrumb_disable = true来禁用这些面包屑。
下面的选项卡窗格列出了您可以在项目配置文件中定义的面包屑导航选项。
[params.ui]
breadcrumb_disable = true
taxonomy_breadcrumb_disable = trueparams:
ui:
breadcrumb_disable: true
taxonomy_breadcrumb_disable: true{
"params": {
"ui": {
"breadcrumb_disable": true,
"taxonomy_breadcrumb_disable": true
}
}
}标题自链接
Docsy 支持使用 Hugo 的’render-heading.html’ [钩子]。
要在您的项目,将“layouts/_default/_markup/render-heading.html”定义为:
{{ template "_default/_markup/td-render-heading.html" . }}
标题自链接锚点类为“.td-heading-self-link”,您可以为您的项目定制。默认情况下,标题自链接样式具有以下默认值:
- 自链接符号为“#”。
- 该符号在移动和触摸设备上始终可见,否则仅显示 悬停或焦点时可见。
您的项目还可以重用(在您自己的自定义标题渲染钩子中)或覆盖标题自链接模板
‘_default/_markup/_td-heading-self-link.html’,定义于[layouts/_default/_markup/td-render-heading.html]。
[layouts/_default/_markup/td-render-heading.html]:https://github.com/google/docsy/tree/main/layouts/_default/_markup/td-render-heading.html [钩子]:https://gohugo.io/templates/render-hooks/
4 - 搜索
Docsy 提供了多种选项,让您的读者搜索您的网站内容,因此您可以选择适合您需求的选项。您可以选择:
- [Google 自定义搜索引擎](#configure-search-with-a-google-custom-search-engine) (GCSE),默认选项,它使用 Google 对您的公共网站的索引来生成搜索结果页面。
- [Algolia DocSearch](#algolia-docsearch),它使用 Algolia 的索引和搜索机制。搜索结果显示为弹出窗口。Algolia DocSearch 对公共文档网站免费。
- [使用 Lunr 进行本地搜索](#local-search-with-lunr),它使用 Javascript 索引和搜索您的站点,而无需连接到外部服务。此选项不要求您的网站是公开的。
如果在项目 configuration file 中启用这些搜索选项中的任何一个,则顶部导航栏右侧会显示一个搜索框。默认情况下,搜索框还会显示在左侧导航窗格中部分菜单的顶部,如果您愿意,或者如果您使用的搜索选项仅适用于顶部搜索框,则可以禁用该搜索框。
You can only enable a single search option at a time
如果您不小心在项目中启用了多个搜索选项配置文件,您将在构建时收到警告,并且未确定为您的网站提供服务时的行为。禁用侧边栏搜索框
默认情况下,搜索框同时显示在顶部导航栏和侧边栏左侧导航窗格的顶部。如果您不想要侧边栏搜索框,请在 ‘hugo.toml’/‘hugo.yaml’/‘hugo.json’ 中将站点参数 ‘sidebar_search_disable’ 设置为 ’true’:
[params.ui]
sidebar_search_disable = trueparams:
ui:
sidebar_search_disable: true{
"params": {
"ui": {
"sidebar_search_disable": true
}
}
}使用 Google 自定义搜索引擎配置搜索
默认情况下,Docsy 使用 [Google 自定义搜索引擎](https://cse.google.com/cse/all) (GCSE) 来搜索您的网站。要启用此功能,您首先需要确保已构建并部署了 [网站的生产版本](/docs/deployment#build-environments-and-indexing),否则您的网站将不会被抓取和索引。
设置网站搜索
- 点击[自定义搜索页面](https://cse.google.com/cse/all)上的新搜索引擎,然后按照说明为已部署的网站创建Google自定义搜索引擎。记下新搜索引擎的 ID。
- 使用“编辑搜索引擎”选项将您想要的任何其他配置添加到搜索引擎中。具体而言,您可能希望执行以下操作:
- 选择外观和感觉。从默认的“叠加”布局更改为“仅结果**”,因为此选项意味着您的搜索结果将嵌入到搜索页面中,而不是显示在单独的框中。单击“保存”以保存更改。
- 编辑默认结果链接行为,以便您网站的搜索结果不会在新标签页中打开。为此,请选择“搜索功能”-“高级”-“Web搜索设置”。在“链接目标”字段中,键入“_parent”。单击“保存”以保存更改。
Tip
Your site search results should show up within a couple of days. If it takes longer than that, you can manually request that your site is indexed by submitting a sitemap through the Google Search Console.添加搜索页面
设置搜索引擎后,您可以将该功能添加到您的网站:
确保在“content/en/search.md”中有一个 Markdown 文件(如果需要,其他语言也有一个文件)来显示您的搜索结果。它只需要一个标题和“layout: search”,如以下示例所示:
+++ title = "Search Results" layout = "search" +++--- title: Search Results layout: search ---{ "title": "Search Results", "layout": "search" }将您的 Google 自定义搜索引擎 ID 添加到“hugo.toml”/“hugo.yaml”/“hugo.json”中的网站参数中。如果需要,您可以为每种语言添加不同的值。
[params] # Google Custom Search Engine ID. Remove or comment out to disable search. gcs_engine_id = "011737558837375720776:fsdu1nryfng"params: gcs_engine_id: 011737558837375720776:fsdu1nryfng{ "params": { "gcs_engine_id": "011737558837375720776:fsdu1nryfng" } }
禁用GCSE搜索
如果您没有为项目指定 Google 自定义搜索引擎 ID,并且未启用任何其他搜索选项,则搜索框不会显示在您的网站中。如果您使用示例站点中的默认“hugo.toml”并想要禁用搜索,只需注释掉或删除相关行即可。
Algolia 文档搜索
作为GCSE的替代方法,您可以使用[AlgoliaDocSearch](https://docsearch.algolia.com),即对公共文档站点免费。Docsy 支持 Algolia DocSearch v3。
Algolia v2 is deprecated
Docsy 以前支持 Algolia DocSearch v2,现已弃用。如果你是现有的 Algolia DocSearch v2 用户,并希望使用最新的 Docsy版本,[跟随迁移 指令](https://docsearch.algolia.com/docs/migrating-from-v2)用于更新 DocSearch 代码片段的 DocSearch 文档。注册 Algolia DocSearch
填写https://docsearch.algolia.com/apply的表格。收到 Algolia DocSearch 后继续下一步项目的参数。
渴望测试 DocSearch?
Docsy 默认为 Algolia test-site 参数不提供任何信息。要启用对 Algolia 测试的搜索,请定义’params.search.algolia’,没有任何其他字段,如下所述。
配置 Algolia DocSearch
确保禁用 [GCSE 搜索](#disabling-gcse-search)。
将项目的 Algolia DocSearch 参数添加到 ‘hugo.toml’/‘hugo.yaml’/‘hugo.json’,例如(使用 Algolia test 值):
[params.search.algolia] appId = "R2IYF7ETH7" apiKey = "599cec31baffa4868cae4e79f180729b" indexName = "docsearch"params: search: algolia: appId: R2IYF7ETH7 apiKey: 599cec31baffa4868cae4e79f180729b indexName: docsearch{ "params": { "search": { "algolia": { "appId": "R2IYF7ETH7", "apiKey": "599cec31baffa4868cae4e79f180729b", "indexName": "docsearch" } } } }
要了解有关 Algolia DocSearch V3 的更多信息,请参阅 [get-started](https://docsearch.algolia.com/docs/DocSearch-v3)。
完成这些步骤后,应在网站。搜索结果显示为弹出窗口,因此您无需添加任何搜索结果搜索结果页面。
自定义 Algolia 模板
您可以通过创建以下模板文件:
- “head.html”使用的“layouts/partials/algolia/head.html”来加载 AlgoliaDocSearch 样式。它还会发出弃用警告’params.algolia_docsearch’。
- “scripts.html”使用的“layouts/partials/algolia/scripts.html”来加载和配置 Algolia DocSearch。将任一文件留空以禁用 Docsy 的实现。
使用 Lunr 进行本地搜索
[伦尔](https://lunrjs.com/) 是一个基于 Javascript 的搜索选项,可让您为网站编制索引并使其可搜索,而无需外部服务器端搜索服务。这是一个不错的选择,特别是对于较小的或非公共网站。
要将 Lunr 搜索添加到您的 Docsy 网站:
在 ‘hugo.toml’/‘hugo.yaml’/‘hugo.json’ 中启用本地搜索。
[params] offlineSearch = trueparams: offlineSearch: true{ "params": { "offlineSearch": true } }删除或注释掉 ‘hugo.toml’/‘hugo.yaml’/‘hugo.json’ 中的任何 GCSE ID,并确保 Algolia DocSearch 设置为 ‘false’,因为您只能启用一种类型的搜索。请参阅[禁用GCSE搜索](#disabling-gcse-search)。
完成这些步骤后,将为您的网站启用本地搜索,并在使用搜索框时将结果显示在下拉列表中。
Tip
如果你使用 Hugo 的本地服务器功能 [在本地测试](/docs/deployment/#serving-your-site-locally),你需要先通过运行 ‘hugo’ 来构建你的 ‘offline-search-index.xxx.json’ 文件。如果在构建“offline-search-index.xxx.json”时运行了 Hugo 服务器,则可能需要停止服务器并重新启动它才能查看搜索结果。更改本地搜索结果的摘要长度
您可以通过在 ‘hugo.toml’/‘hugo.yaml’/‘hugo.json’ 中设置 ‘offlineSearchSummaryLength’ 来自定义摘要长度。
#Enable offline search with Lunr.js
[params]
offlineSearch = true
offlineSearchSummaryLength = 200params:
offlineSearch: true
offlineSearchSummaryLength: 200{
"params": {
"offlineSearch": true,
"offlineSearchSummaryLength": 200
}
}更改本地搜索的最大结果计数
您可以通过在 ‘hugo.toml’/‘hugo.yaml’/‘hugo.json’ 中设置 ‘offlineSearchMaxResults’ 来自定义最大结果计数。
[params]
offlineSearch = true
offlineSearchMaxResults = 25params:
offlineSearch: true
offlineSearchMaxResults: 25{
"params": {
"offlineSearch": true,
"offlineSearchMaxResults": 25
}
}更改本地搜索结果弹出窗口的宽度
搜索结果弹出窗口的宽度会根据内容自动变宽。
如果要限制宽度,请将以下 scss 添加到“assets/scss/_variables_project.scss”中。
.td-offline-search-results {
max-width: 460px;
}
从本地搜索结果中排除页面
要从本地搜索结果中排除页面,请在每个页面的卷首添加“exclude_search: true”:
+++
title = "Index"
weight = 10
exclude_search = true
+++---
title: "Index"
weight: 10
exclude_search: true
---{
"title": "Index",
"weight": 10,
"exclude_search": true
}5 - 文档版本控制
根据您的项目的发布和版本控制,您可能希望让用户访问您的文档的先前版本。如何部署先前的版本取决于您。本页面介绍了 Docsy 中可用的功能,可用于在不同版本的文档之间提供导航,并在归档站点上显示信息横幅。
添加版本下拉菜单
如果在 hugo.toml/hugo.yaml/hugo.json 中添加一些 [params.versions],Docsy 主题将在顶级菜单中添加版本选择器下拉菜单。您可以指定每个版本的 URL 和名称,如下面的示例所示:
# Add your release versions here
[[params.versions]]
version = "master"
url = "https://master.kubeflow.org"
[[params.versions]]
version = "v0.2"
url = "https://v0-2.kubeflow.org"
[[params.versions]]
version = "v0.3"
url = "https://v0-3.kubeflow.org"params:
versions:
- version: master
url: 'https://master.kubeflow.org'
- version: v0.2
url: 'https://v0-2.kubeflow.org'
- version: v0.3
url: 'https://v0-3.kubeflow.org'{
"params": {
"versions": [
{
"version": "master",
"url": "https://master.kubeflow.org"
},
{
"version": "v0.2",
"url": "https://v0-2.kubeflow.org"
},
{
"version": "v0.3",
"url": "https://v0-3.kubeflow.org"
}
]
}
} 记得添加当前版本,以便用户可以导航回去!
版本下拉菜单的默认标题为 Releases。要更改标题,请更改 hugo.toml/hugo.yaml/hugo.json 中的 version_menu 参数:
[params]
version_menu = "Releases"params:
version_menu: Releases{
"params": {
"version_menu": "Releases"
}
} 如果将 version_menu_pagelinks 参数设置为 true,则版本下拉菜单中的链接指向其他版本中的当前页面,而不是主页面。如果文档在不同版本之间几乎没有变化,则此功能可能很有用。请注意,如果其他版本中不存在当前页面,则链接将被broken。
您可以在navigation and search.指南中阅读有关 Docsy 菜单的更多信息。
在归档的文档站点上显示横幅
如果为文档的早期版本创建了归档快照,则可以在归档的文档的每个页面顶部添加注释,以让读者知道他们正在查看未维护的快照,并向他们提供最新版本的链接。
例如,请参见 Kubeflow v0.6 的归档文档:
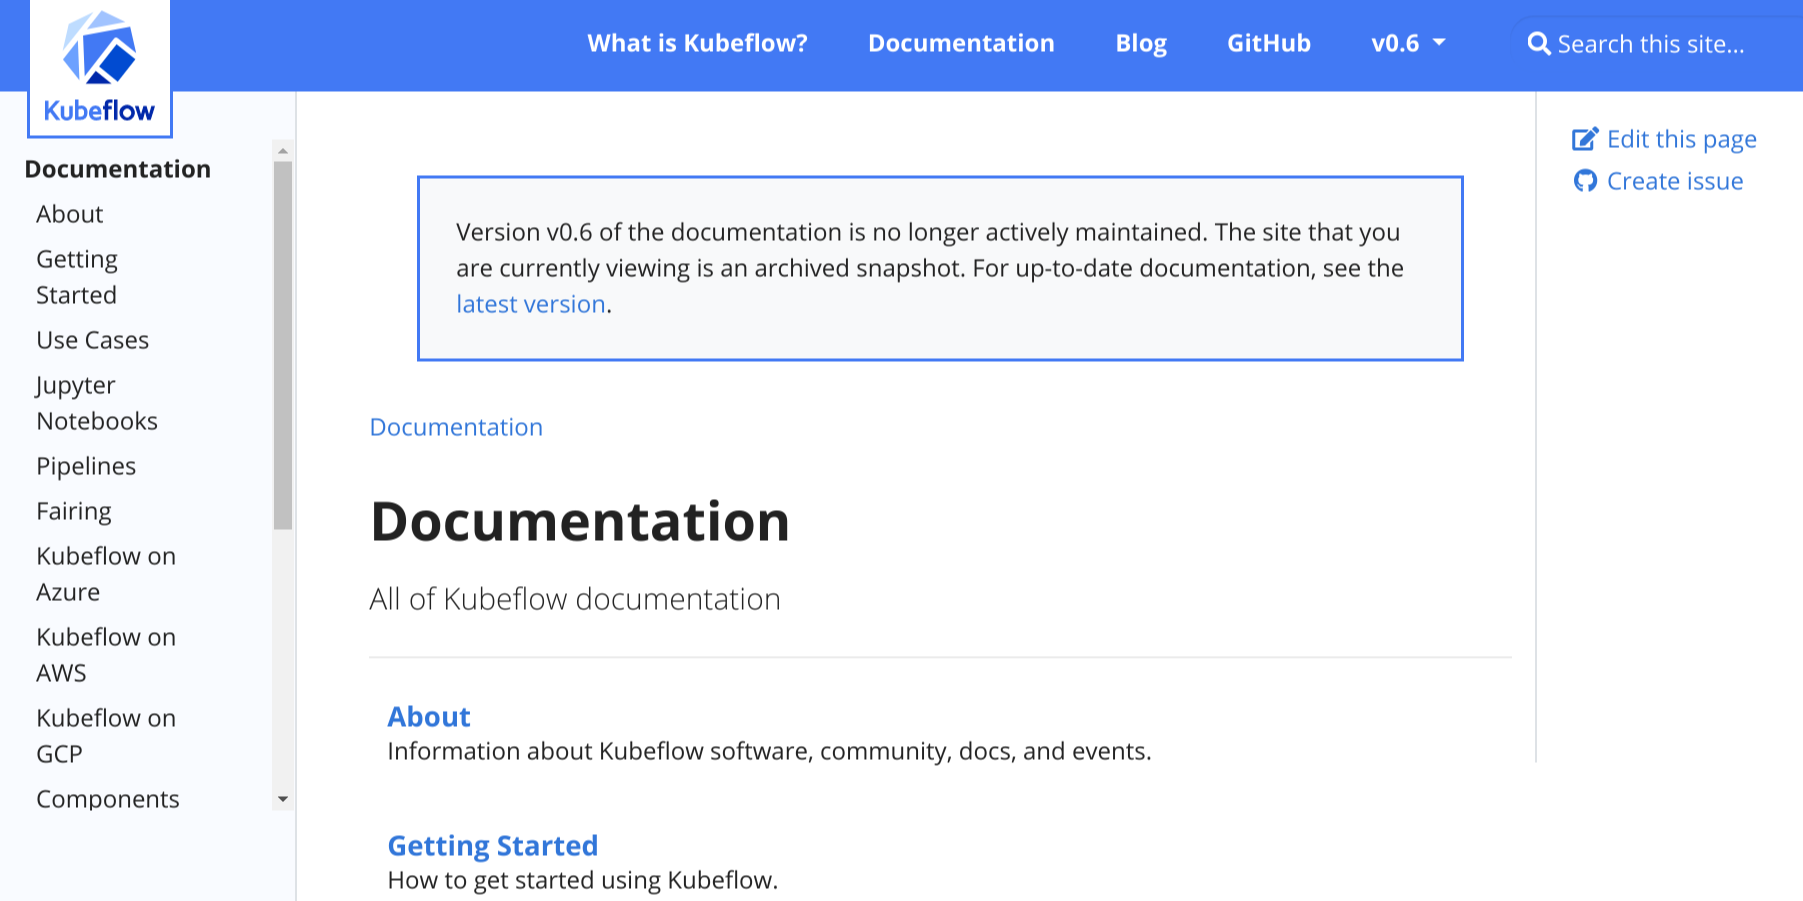
图1:Kubeflow v0.6归档文档上的横幅
要在文档站点上添加横幅,请在hugo.toml/hugo.yaml/hugo.json文件中进行以下更改:
将
archived_version参数设置为true:[params] archived_version = trueparams: archived_version: true{ "params": { "archived_version": true } }将
version参数设置为归档文档集的版本。例如,如果归档文档是版本0.1:[params] version = "0.1"params: version: 0.1{ "params": { "version": "0.1" } }确保
url_latest_version包含您想要指向读者的站点的URL。在大多数情况下,这应该是您文档的最新版本的URL:[params] url_latest_version = "https://your-latest-doc-site.com"params: url_latest_version: https://your-latest-doc-site.com{ "params": { "url_latest_version": "https://your-latest-doc-site.com" } }
6 - Docsy简码
使用Docsy的Hugo简码快速构建站点页面。
Hugo 允许你定义并使用 shortcodes,而不是从头编写所有站点页面。这些可重复使用的内容片段可以包含在你的页面中,通常使用 HTML 创建难以或不可能在简单的 Markdown 中实现的效果。简码还可以具有参数,例如,让你向花哨的简码文本框中添加自己的文本。除了 Hugo 的内置简码外,Docsy 还提供了一些自己的 简码,以帮助你构建页面。
简码分隔符
如下所示,使用花括号样式的简码分隔符\{\{\<...\>\}\}告诉Hugo内部内容是HTML/纯文本,无需进一步处理。通过使用分隔符\{\{\%...\%\}\},Hugo将把简码body视为Markdown。您可以在页面中使用这两种样式。
简码块
本主题附带一组自定义页面块(Page Block )简码,可用于组合着陆页面、About页面等。
这些块共享一些通用参数:
height
块容器的预定义高度。可以是
min、med、max、full或auto中的一个。将其设置为full将填充视口高度,这对于着陆页非常有用。color
如果未提供,块将被分配一个主题调色板的颜色,但如果需要,您可以设置自己的颜色。您可以使用所有 Bootstrap 的颜色名称、主题颜色名称或灰度阴影。一些例子包括
primary、white、dark、warning、light、success、300、blue、orange。这将成为块的背景颜色,但文本颜色将适应以获得适当的对比度。
blocks/cover
blocks/cover简码创建填充页面顶部的着陆页类型块。
\{\{\< blocks/cover title="Welcome!" image_anchor="center" height="full" color="primary" \>\}\}
<div class="mx-auto">
<a class="btn btn-lg btn-primary me-3 mb-4" href="\{\{\< relref "/docs" \>\}\}">
Learn More <i class="fa-solid fa-circle-right ms-2"></i>
</a>
<a class="btn btn-lg btn-secondary me-3 mb-4" href="https://example.org">
Download <i class="fa-brands fa-github ms-2 "></i>
</a>
<p class="lead mt-5">This program is now available in <a href="#">AppStore!</a></p>
<div class="mx-auto mt-5">
\{\{\< blocks/link-down color="info" \>\}\}
</div>
</div>
\{\{\< /blocks/cover \>\}\}
请注意,上面提到的相关简码参数将具有合理的默认值,但为了完整性而包含在此处。
| Parameter | Default | Description |
|---|---|---|
| title | The main display title for the block. | |
| image_anchor | ||
| height | See above. | |
| color | See above. | |
| byline | Byline text on featured image. |
要设置背景图像,请在该页面的Page Bundle中放置一个带有"background"单词的图像名称。例如,在我们的示例站点中,首页的封面块中的背景图像为featured-background.jpg,在同一目录中。
Tip
如果在图像名称中还包括featured单词,例如my-featured-background.jpg,则在共享时它也将用作Twitter Card图像。 有关可用图标,请参见Font Awesome。
blocks/lead
blocks/lead简码是一个简单的引导/标题块,具有居中的文本和向下箭头指向下一节。
\{\{\% blocks/lead color="dark" \%\}\}
TechOS is the OS of the future.
Runs on **bare metal** in the **cloud**!
\{\{\% /blocks/lead \%\}\}
| Parameter | Default | Description |
|---|---|---|
| height | auto | See Shortcode blocks |
| color | .Ordinal | See Shortcode blocks |
blocks/section
blocks/section简码旨在作为通用内容容器使用。它有两种"口味(flavors)",一种适用于一般内容,另一种则具有更适合包装水平特征章节的样式。
下面的示例显示一个包含3个特征章节的章节。
\{\{\< blocks/section color="dark" type="row" \>\}\}
\{\{\% blocks/feature icon="fa-lightbulb" title="Fastest OS **on the planet**!" \%\}\}
The new **TechOS** operating system is an open source project. It is a new project, but with grand ambitions.
Please follow this space for updates!
\{\{\% /blocks/feature \%\}\}
\{\{\% blocks/feature icon="fa-brands fa-github" title="Contributions welcome!" url="https://github.com/gohugoio/hugo" \%\}\}
We do a [Pull Request](https://github.com/gohugoio/hugo/pulls) contributions workflow on **GitHub**. New users are always welcome!
\{\{\% /blocks/feature \%\}\}
\{\{\% blocks/feature icon="fa-brands fa-twitter" title="Follow us on Twitter!" url="https://twitter.com/GoHugoIO" \%\}\}
For announcement of latest features etc.
\{\{\% /blocks/feature \%\}\}
\{\{\< /blocks/section \>\}\}
| Parameter | Default | Description |
|---|---|---|
height | See above. | |
color | See above. | |
type | Specify “container” (the default) if you want a general container, or “row” if the section will contain columns – which must be immediate children. |
blocks/feature
\{\{\% blocks/feature icon="fa-brands fa-github" title="Contributions welcome!" url="https://github.com/gohugoio/hugo" \%\}\}
We do a [Pull Request](https://github.com/gohugoio/hugo/pulls) contributions workflow on **GitHub**. New users are always welcome!
\{\{\% /blocks/feature \%\}\}
| Parameter | Default | Description |
|---|---|---|
| title | The title to use. | |
| url | The URL to link to. | |
| url_text | The language parameter value of ui_read_more | The link text to use. |
| icon | The icon class to use. |
blocks/link-down
blocks/link-down简码创建导航链接到下一个章节。它旨在与其他块简码结合使用。
<div class="mx-auto mt-5">
\{\{\< blocks/link-down color="info" \>\}\}
</div>
| 参数 | 默认值 | 描述 |
|---|---|---|
| color | info | See above. |
简码助手(helpers)
alert
alert简码创建一个警报块,可用于显示通知或警告。
{{% alert title="Warning" color="warning" %}}
This is a warning.
{{% /alert %}}
Renders to:
Warning
This is a warning.| Parameter | Default | Description |
|---|---|---|
| color | primary | One of the theme colors, eg primary, info, warning etc. |
pageinfo
pageinfo 简码创建了一个文本框,您可以使用它来为页面添加横幅信息,例如告诉用户页面包含占位内容,内容已过时或记录了一个 beta 功能。
\{\{\% pageinfo color="primary" \%\}\}
This is placeholder content.
\{\{\% /pageinfo \%\}\}
渲染成:
| 参数 | 默认值 | 描述 |
|---|---|---|
| color | primary | 其中之一的主题颜色,例如primary,info,warning等。 |
imgproc
imgproc简码会在当前Page Bundle中查找图片,并根据给定的一组处理指令对其进行缩放。
\{\{\< imgproc spruce Fill "400x450" \>\}\}
Norway Spruce <i>Picea abies</i> shoot with foliage buds.
\{\{\< /imgproc \>\}\}
Use the syntax above if the inner content and/or the byline parameter of your shortcode is authored in markdown. In case of HTML content, use <> as innermost delimiters: {{< imgproc >}}<b>HTML</b> content{{< /imgproc >}}.
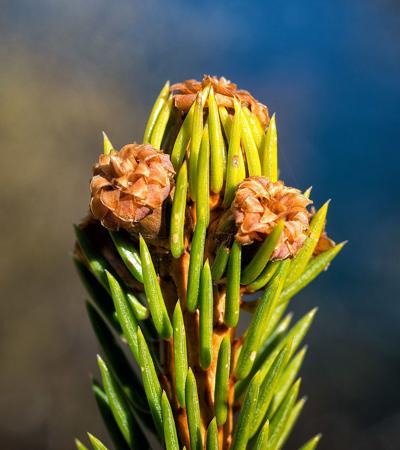
Norway Spruce Picea abies shoot with foliage buds.
上面的示例还添加了带有照片归属地的副标题。当使用来自WikiMedia等免费许可的插图时,大多数情况下需要一种方法来归属作者或许可证持有人。您可以在你的页面前置元数据中的页面资源中添加元数据。在此主题中,byline 参数通常用于此目的:
+++
[[resources]]
src = "**spruce*.jpg"
[resources.params]
byline = "*Photo*: Bjørn Erik Pedersen / CC-BY-SA"
+++---
resources:
- src: "**spruce*.jpg"
params:
byline: "*Photo*: Bjørn Erik Pedersen / CC-BY-SA"
---{
"resources": [
{
"src": "**spruce*.jpg",
"params": {
"byline": "*Photo*: Bjørn Erik Pedersen / CC-BY-SA"
}
}
]
}| Parameter | Description |
|---|---|
| 1 | The image filename or enough of it to identify it (we do Glob matching) |
| 2 | Command. One of Fit, Resize, Fill or Crop. See Image Processing Methods. |
| 3 | Processing options, e.g. 400x450 r180. See Image Processing Options. |
swaggerui
swaggerui 简码可以放置在任何使用 swagger 布局 的页面中;它使用任何 OpenAPI YAML 或 JSON 文件作为源来渲染 Swagger UI。该文件可以托管在任何位置,例如您站点的根/static folder。
+++
title = "Pet Store API"
type = "swagger"
weight = 1
description = "Reference for the Pet Store API"
+++
{{<swaggerui src="/openapi/petstore.yaml">}}---
title: "Pet Store API"
type: swagger
weight: 1
description: Reference for the Pet Store API
---
{{<swaggerui src="/openapi/petstore.yaml">}}{
"title": "Pet Store API",
"type": "swagger",
"weight": 1,
"description": "Reference for the Pet Store API"
}
{{<swaggerui src="/openapi/petstore.yaml">}} 您可以通过覆盖Swagger的CSS或通过编辑和编译Swagger UI dist自己来自定义Swagger UI的外观和感觉,并替换themes/docsy/static/css/swagger-ui.css。
redoc
redoc简码使用开源Redoc工具从OpenAPI YAML或JSON文件中渲染参考API文档。该文件可以托管在您喜欢的任何位置,例如在站点的根/static 文件夹中,但您也可以使用一个URL,例如:
---
title: "Pet Store API"
type: docs
weight: 1
description: Reference for the Pet Store API
---
\{\{\< redoc "https://raw.githubusercontent.com/OAI/OpenAPI-Specification/main/examples/v2.0/yaml/petstore.yaml" \>\}\}
iframe
使用此简码,您可以将外部内容作为内联框架(iframe)嵌入Docsy页面,参见:https://www.w3schools.com/tags/tag_iframe.asp
| 参数 | 默认值 | 描述 |
|---|---|---|
| src | 外部内容的URL | |
| width | 100% | iframe的宽度 |
tryautoheight | true | 如果为 true,则该简码将尝试使用 JavaScript 计算嵌入式内容所需的高度,如此处所述:https://stackoverflow.com/a/14618068。这仅在嵌入式内容与当前域名相同时才可能实现(https://stackoverflow.com/questions/22086722/resize-cross-domain-iframe-height)。请注意,即使嵌入式内容与当前域名相同,仍取决于内容的结构是否能够正确计算高度。 |
| style | min-height:98vh; border:none; | 用于 iframe 的 CSS 样式。min-height: 98vh; 是在 tryautoheight 不起作用时的备选项。border: none; 将 iframe 的边框删除 - 如果您希望嵌入式内容看起来更像页面中的内部内容,则这很有用。 |
| sandbox | false | 您可以通过设置 sandbox = true 完全打开沙盒模式,或使用在 HTML 标准 中定义的 iframe 参数 sandbox 的常见值来允许特定功能。 |
| name | iframe-name | 指定该iframe的名称。 |
| id | iframe-id | 设置该iframe的ID。 |
| class | 设置该iframe的类的可选参数。 | |
| sub | 您的浏览器无法显示嵌入框架。您可以通过以下链接访问嵌入页面: | 如果用户的浏览器无法显示嵌入式框架,则显示的文本(除了嵌入的 URL)。 |
警告
只有在服务器的
X-Frame-Options未设置或明确允许被嵌入到您的站点时,才能嵌入外部内容。有关详细信息,请参见https://developer.mozilla.org/zh-CN/docs/Web/HTTP/Headers/X-Frame-Options。
有几种工具可用于检查站点是否可以通过iframe嵌入,例如:https://gf.dev/x-frame-options-test。请注意,当此测试显示"Couldn’t find the X-Frame-Options header in the response headers.“时,您可以嵌入它,但是当测试显示"Great! X-Frame-Options header was found in the HTTP response headers as highlighted below.“时,除非已明确启用了您的站点,否则您不可以嵌入它。
Tabbed panes 选项卡式窗格
在编写内容时,有时非常有用的是选项卡式窗格。一个常见的用例是显示多个语法突出显示的代码块,这些代码块展示了同一问题在不同编程语言中的解决方法。例如,下面的选项卡式窗格显示了通常在学习新编程语言时编写的Hello world!程序的语言特定变体:
# include <stdio.h>
# include <stdlib.h>
int main(void)
{
puts("Hello World!");
return EXIT_SUCCESS;
}# include <iostream>
int main()
{
std::cout << "Hello World!" << std::endl;
}package main
import "fmt"
func main() {
fmt.Printf("Hello World!\n")
}class HelloWorld {
static public void main( String args[] ) {
System.out.println( "Hello World!" );
}
}fun main(args : Array<String>) {
println("Hello, world!")
}print "Hello world"<?php
echo 'Hello World!';
?>
print("Hello World!")puts "Hello World!"object HelloWorld extends App {
println("Hello world!")
} Docsy模板提供了两个简码tabpane和tab,让您轻松创建选项卡式窗格。要了解如何使用它们,请查看以下代码块,该代码块渲染为右对齐的窗格,其中一个选项卡被禁用,另外三个选项卡处于活动状态:
\{\{\< tabpane text=true right=true \>\}\}
\{\{\% tab header="**Languages**:" disabled=true /\%\}\}
\{\{\% tab header="English" lang="en" \%\}\}

Welcome!
\{\{\% /tab \%\}\}
\{\{\< tab header="German" lang="de" \>\}\}
<b>Herzlich willkommen!</b>
<img src="flags/de.png" alt="Flag Germany" style="float: right; padding: 0 0 0 0px">
\{\{\< /tab \>\}\}
\{\{\% tab header="Swahili" lang="sw" \%\}\}

**Karibu sana!**
\{\{\% /tab \%\}\}
\{\{\< /tabpane \>\}\}
这段代码转换为下面的右对齐选项卡窗格,显示英语、德语或斯瓦希里语的Welcome!问候:
 Welcome!

 Karibu sana!
简码详细信息
选项卡式窗格使用两个简码实现:
tabpane简码是选项卡的容器元素。该简码可以包含可选的命名参数lang、highlight和right。可选参数lang和highlight的值会作为 Hugo 内置函数 highlight 的第二个LANG和第三个OPTIONS参数传递,该函数用于渲染各个选项卡中的代码块。如果您想要右对齐选项卡,请指定right=true。如果选项卡的标题文本等于选项卡代码块中使用的语言(如上面的第一个选项卡窗格示例),您可以在周围的tabpane简码中指定langEqualsHeader=true。然后,各个选项卡的标题文本将自动设置为相应选项卡的lang参数。各种选项卡简码代表您想要显示的选项卡。对于每个选项卡,通过指定命名参数
header来设置选项卡的标题文本。如果header参数是您选项卡简码中唯一的参数,则可以将标题设置为未命名参数,例如{ tab "My header" }} … {{ /tab }}。如果您的选项卡简码没有任何参数,则选项卡的header 将默认为Tab n。要将窗格分为左对齐和右对齐的选项卡组,请在分隔选项卡中指定right=true。通过多次设置right=true,您甚至可以渲染多个选项卡组。通过指定参数disabled=true可以禁用选项卡。对于启用的选项卡,有两种内容显示模式,代码表示和文本表示:- 默认情况下,选项卡的内容将渲染为代码块。为了获得适当的语法高亮显示,请为每个选项卡指定命名参数
lang,并可选地指定参数highlight。在父选项卡窗格简码中设置的参数将被覆盖。 - 如果您的选项卡内容应该渲染为具有不同样式和可选图像的文本,请将
text=true作为tabpane(或tab)的参数。如果您的内容是 Markdown,请使用百分号%作为选项卡简码的最外层分隔符,您的标记应如下所示:\{\{\% tab \%\}\}Your **markdown** content\{\{\% /tab \%\}\}。对于 HTML 内容,请使用方括号<>作为最外层分隔符:\{\{\< tab \>\}\}Your <b>HTML</b> content\{\{\< /tab \>\}\}。
- 默认情况下,选项卡的内容将渲染为代码块。为了获得适当的语法高亮显示,请为每个选项卡指定命名参数
信息
默认情况下,所选tab(选项卡) 的语言将存储并在不同的浏览器会话之间保留。如果选项卡内的内容长度差异很大,则在切换选项卡时可能会导致不必要的滚动。要禁用此不必要的行为,请在
tabpane简码中指定persistLang=false。
Card panes 卡片窗格
在编写内容时,将类似的文本块或代码片段放在类似卡片的元素上,可以让它们可选地并排呈现,这在某些情况下非常有用。下面是一个样本卡片组,展示了美国的前四位总统,我们来演示一下这个功能:
*1732 †1799
President: 1789 – 1797


* 1735 † 1826
President: 1797 – 1801


* 1743 † 1826
President: 1801 – 1809


* 1751 † 1836
President: 1809 – 1817


Docsy 支持通过不同的简码创建此类卡片窗格:
cardpane简码是用来包含不同卡片的容器元素。card简码代表一个单独的卡片,每个简码代表一个独立的卡片。虽然卡片通常会出现在卡片组内,但一个单独的卡片也可以单独呈现。card简码可以包含文本、图片或任何其他任意类型的 Markdown 或 HTML 标记作为内容。如果你的内容是编程代码,建议使用card-code简码,这是一种具有代码高亮和其他可选功能(如行号、某些行的高亮等)的特殊卡片。
简码card(用于文本、图像等)
如上所述,卡片可以使用 card 或 card-code 简码之一进行编码。如果您的内容是除了编程代码以外的任何类型的文本,请使用通用的 card 简码。以下代码示例演示如何编码card 元素:
\{\{\< card header="**Imagine**" title="Artist and songwriter: John Lennon" subtitle="Co-writer: Yoko Ono"
footer=""\>\}\}
Imagine there's no heaven, It's easy if you try<br/>
No hell below us, above us only sky<br/>
Imagine all the people living for today…
…
\{\{\< /card \>\}\}
此代码转换为下面的左侧的卡片,显示 John Lennon 著名歌曲 Imagine 的歌词。右侧的第二个说明性card 元素指示并解释了card 的各个组成部分:
… {{}}
This code translates to the left card shown below, showing the lyrics of John Lennon's famous song `Imagine`. A second explanatory card element to the right indicates and explains the individual components of a card:
<div class="td-card-group card-group p-0 mb-4">
<div class="td-card card border me-4">
<div class="card-header">
<strong>Imagine</strong>
</div>
<div class="card-body">
<h5 class="card-title">
Artist and songwriter: John Lennon</h5>
<h6 class="card-title ms-2 text-body-secondary">
Co-writer: Yoko Ono</h6>
<p class="card-text">
Imagine there's no heaven, It's easy if you try<br/>
No hell below us, above us only sky<br/>
Imagine all the people living for today…
Imagine there's no countries, it isn't hard to do<br/>
Nothing to kill or die for, and no religion too<br/>
Imagine all the people living life in peace…
Imagine no possessions, I wonder if you can<br/>
No need for greed or hunger - a brotherhood of man<br/>
Imagine all the people sharing all the world…
You may say I'm a dreamer, but I'm not the only one<br/>
I hope someday you'll join us and the world will live as one
</p>
</div>
<div class="card-footer">
<img src="https://upload.wikimedia.org/wikipedia/commons/thumb/5/51/Firma_de_John_Lennon.svg/320px-Firma_de_John_Lennon.svg.png" alt="SignatureJohnLennon" title="Signature John Lennon"></div>
</div>
<div class="td-card card border me-4">
<div class="card-header">
<strong>Header</strong>: specified via named parameter <code>Header</code>
</div>
<div class="card-body">
<h5 class="card-title">
<strong>Card title</strong>: specified via named parameter <code>title</code></h5>
<h6 class="card-title ms-2 text-body-secondary">
<strong>Card subtitle</strong>: specified via named parameter <code>subtitle</code></h6>
<p class="card-text">
<p><strong>Content</strong>: inner content of the shortcode, this may be plain text or formatted text, images, videos, … . If your content is markdown, use the percent sign <code>%</code> as outermost delimiter of your <code>card</code> shortcode, your markup should look like <code>{{% card %}}Your **markdown** content{{% /card %}}</code>. In case of HTML content, use square brackets <code><></code> as outermost delimiters: <code>{{< card >}}Your <b>HTML</b> content{{< /card >}}</code></p>
</p>
</div>
<div class="card-footer">
<strong>Footer</strong>: specified via named parameter <code>footer</code></div>
</div>
</div>
虽然卡片的主要内容取自 `card` 简码的内部标记,但可选元素 `footer`、`header`、`title` 和 `subtitle` 都作为简码的命名参数指定。
### 简码`card-code`(用于编程代码)
如果您想在卡片上显示编程代码,可以使用专门的`card-code` 简码。下面的示例演示了如何用C编写著名的`Hello world!`应用程序的卡片元素:
```go-html-template
\{\{\< card-code header="**C**" lang="C" \>\}\}
#include <stdio.h>
#include <stdlib.h>
int main(void)
{
puts("Hello World!");
return EXIT_SUCCESS;
}
\{\{\< /card-code \>\}\}
这段代码将转换为下面的卡片:
# include <stdio.h>
# include <stdlib.h>
int main(void)
{
puts("Hello World!");
return EXIT_SUCCESS;
}
card-code 简码可以可选地包含lang和/或highlight命名参数。这些可选参数的值作为第二个LANG和第三个OPTIONS参数传递给Hugo的内置highlight函数,该函数用于渲染在卡片上呈现的代码块。
卡片组
将两个或多个卡片并排显示可以通过将它们放在cardpane简码的开放和关闭元素之间轻松实现。卡片组的一般标记与选项卡窗格的标记非常相似:
\{\{\< cardpane \>\}\}
\{\{\< card header="Header card 1" \>\}\}
Content card 1
\{\{\< /card \>\}\}
\{\{\< card header="Header card 2" \>\}\}
Content card 2
\{\{\< /card \>\}\}
\{\{\< card header="Header card 3" \>\}\}
Content card 3
\{\{\< /card \>\}\}
\{\{\< /cardpane \>\}\}
与选项卡(tabs)不同,卡片(cards )是并排呈现的。这尤其有用,如果您想在两个卡片上比较不同的编程技术(传统 vs. 现代),就像上面的示例演示的那样:
File[] hiddenFiles = new File("directory_name")
.listFiles(new FileFilter() {
public boolean accept(File file) {
return file.isHidden();
}
});
File[] hiddenFiles = new File("directory_name")
.listFiles(File::isHidden);
包含外部文件
有时候有一些内容对多个文档都是相关的,或者是存储在一个不一定是文档的文件中。对于这样的情况,readfile 简码允许您将外部文件的内容导入到文档中。
重用文档
如果您想在多个文档中重复使用一些内容,可以将该内容编写在一个单独的文件中,然后在需要时包含它。
例如,假设您有一个名为installation.md的文件,其内容如下:
## Installation
\{\{\% alert title="Note" color="primary" \%\}\}
Check system compatibility before proceeding.
\{\{\% /alert \%\}\}
1. Download the installation files.
1. Run the installation script
`sudo sh install.sh`
1. Test that your installation was successfully completed.
您可以将此部分导入到另一个文档中:
The following section explains how to install the database:
\{\{\% readfile "installation.md" \%\}\}
这将渲染出好像指令在父文档中一样。导入文件包含简码时需要 Hugo v0.101.0+ 才能正确被渲染。
The following section explains how to install the database:
Installation
Note
Check system compatibility before proceeding.
Download the installation files.
Run the installation script
sudo sh install.shTest that your installation was successfully completed.
该参数是该文件的相对路径。仅支持在父文件的工作目录下的相对路径。
对于工作目录之外的文件,可以使用以 / 开头的绝对路径。根目录是 /content 文件夹。
包含代码文件
假设您有一个包含多个代码示例的includes文件夹,您希望将其用作文档的一部分。您可以使用readfile并带有一些额外的参数:
To create a new pipeline, follow the next steps:
1. Create a configuration file `config.yaml`:
\{\{\< readfile file="includes/config.yaml" code="true" lang="yaml" \>\}\}
2. Apply the file to your cluster `kubectl apply config.yaml`
该代码自动读取includes/config.yaml的内容并将其插入到文档中。渲染后的文本如下所示:
To create a new pipeline, follow the next steps:
Create a configuration file
config.yaml:apiVersion: tekton.dev/v1beta1 kind: Task metadata: name: hello spec: steps: - name: echo image: alpine script: | #!/bin/sh echo "Hello World"Apply the file to your cluster
kubectl apply config.yaml
Warning
为了使代码高亮显示正常工作,必须使用\{\{\< \>\}\}的分隔符。 该"file"参数是文件的相对路径。仅支持在父文件的工作目录下的相对路径。
对于工作目录之外的文件,可以使用以 / 开头的绝对路径。根目录是 /content 文件夹。
| Parameter | Default | Description |
|---|---|---|
| file | Path of external file | |
| code | false | Boolean value. If true the contents is treated as code |
| lang | plain text | Programming language |
错误报告
如果该简码无法找到指定的文件,则该简码会抛出编译错误。
在下面的示例中,如果无法找到includes/deploy.yml文件,Hugo会抛出编译错误:
\{\{\< readfile file="includes/deploy.yaml" code="true" lang="yaml" \>\}\}
或者,Hugo可以在呈现的页面上显示一条消息,而不是抛出编译错误。添加draft="true"参数。例如:
\{\{\< readfile file="includes/deploy.yaml" code="true" lang="yaml" draft="true" \>\}\}
条件文本
conditional-text 简码允许您根据配置文件中设置的 buildCondition 参数的值来显示或隐藏内容的某些部分。如果您正在从相同的源生成不同的构建,例如使用不同的产品名称,那么这将非常有用。这个简码帮助您处理这些构建之间的小差异。
\{\{\% conditional-text include-if="foo" \%\}\}
This text appears in the output only if `buildCondition = "foo" is set in your config file`.
\{\{\% /conditional-text \%\}\}
\{\{\% conditional-text exclude-if="bar" \%\}\}
This text does not appear in the output if `buildCondition = "bar" is set in your config file`.
\{\{\% /conditional-text \%\}\}
如果您正在使用此简码,请注意,在求值条件时,子字符串匹配也将被视为匹配。这意味着,如果您设置了 include-if="foobar",而 buildcondition = "foo",则匹配!
7 - Logo和图片
添加您的logo
默认情况下,Docsy在导航栏的开头即极左处显示一个站点logo。将您的项目的SVG logo放在assets/icons/logo.svg中。这将覆盖主题中默认的Docsy logo。
如果您不希望在导航栏中出现logo,则在您的项目配置中将navbar_logo设置为false:
[params.ui]
navbar_logo = falseparams:
ui:
navbar_logo: false{
"params": {
"ui": {
"navbar_logo": false
}
}
} 有关样式化您的logo的信息,请参见样式化您的项目logo和名称。
使用 icons
Docsy 默认包含了免费的 FontAwesome 图标,其中包括 GitHub 和 Stack Overflow 等网站的logo。您可以在 FontAwesome 文档 中查看所有可用的图标,包括 FontAwesome 版本以及该图标是否可供免费使用。检查 Docsy 的 package.json 和发行说明,了解 Docsy 当前包含的 FontAwesome 版本。
您可以在 顶级菜单、章节菜单 或文本的任何位置添加 FontAwesome 图标。
添加您的favicon
最简单的方法是通过 http://cthedot.de/icongen(允许您从单个图像创建各种图标大小和选项)和/或 https://favicon.io 来创建一组网站图标,然后将它们放在站点项目的 static/favicons 目录中。这将覆盖本主题的默认图标。
请注意,https://favicon.io 并不像 Icongen 那样创建范围广泛的尺寸,但它可以让您快速从文本创建 favicon:如果您想创建文本 favicon,则可以使用该站点生成它们,然后使用 Icongen 从生成的 .png 文件中创建更多尺寸(如果需要)。
如果您有特殊的网站图标要求,可以创建自己的 layouts/partials/favicons.html 文件并添加相应的链接。
添加图像
着陆页面
Docsy 的 blocks/cover shortcode可以方便地向你的 着陆 pages 中添加大型封面图片。这个 简码 在 landing page 的 Page Bundle 中查找一个名字中带有"background"的图片——例如,如果你复制了本示例站点,则 content/en/_index.html 中的 landing page 图片是 content/en/featured-background.jpg。
你可以使用块的 height 参数指定 cover 块容器(及其图片)的首选显示高度。对于全视口高度,请使用 full:
{{< blocks/cover title="Welcome to the Docsy Example Project!" image_anchor="top" height="full" >}}
...
{{< /blocks/cover >}}
对于较短的图片,例如本示例站点的 About 页面,请使用 min、med、max 或 auto(实际图片的高度)之一:
{{< blocks/cover title="About the Docsy Example" image_anchor="bottom" height="min" >}}
...
{{< /blocks/cover >}}
其他页面
要向其他页面添加内联图片,请使用 imgproc shortcode。或者,如果你喜欢,只需使用常规的 Markdown 或 HTML 图像,并将你的图像文件添加到你的项目的 static 目录中。你可以在Adding static content.中了解更多关于使用此目录的信息。
在本站点中使用的图片
8 - 打印支持
大多数浏览器中的个别文档页面都可以很好地打印,因为布局已经被设计成从打印输出中省略导航界面。
在一些站点上,启用"打印整个章节"功能可能很有用(就像在本用户指南中所看到的)。选择此选项将使用适合打印的格式呈现当前顶级章节(例如此页面的Content 和Customization)的所有子页面和子章节,并附带该章节的目录。
要启用此功能,请在站点的hugo.toml/hugo.yaml/hugo.json文件中为"section"类型添加"print"输出格式:
[outputs]
section = [ "HTML", "RSS", "print" ]outputs:
section:
- HTML
- RSS
- print{
"outputs": {
"section": [
"HTML",
"RSS",
"print"
]
}
}然后,站点应在右侧导航中显示一个"打印整个章节"的链接。
进一步的定制
禁用目录
要在可打印视图中禁用目录,请在页面前置元数据或hugo.toml/hugo.yaml/hugo.json中将disable_toc参数设置为true:
+++
…
disable_toc = true
…
+++
---
…
disable_toc: true
…
---{
…,
"disable_toc": true,
…
}[params.print]
disable_toc = trueparams:
print:
disable_toc: true{
"params": {
"print": {
"disable_toc": true
}
}
}布局钩子
有一些布局的partial和hook被定义用于自定义打印格式。它们可以在layouts/partials/print中找到。
Hook可以按类型定义。例如,您可能想自定义"blog"页面和"docs"页面的标题布局。可以通过创建layouts/partials/print/page-heading-<type>.html来实现,例如page-heading-blog.html。它默认使用页面title 和description 作为标题(heading)。
类似地,每个页面的格式可以通过创建layouts/partials/print/content-<type>.html进行自定义。
9 - 分析、用户反馈和SEO
添加分析
Docsy 主题基于 Hugo 对 Google Analytics 的支持,Hugo 通过 内部模板 提供支持。一旦您按照下面的说明设置了分析,您的网站使用信息(如页面浏览量)将发送到您的 Google Analytics 账户。
先决条件
在继续之前,您需要为您的网站获取一个 分析 ID(技术上称为测量 ID 或属性 ID,但在本指南中我们将使用"analytics ID(分析 ID)“这个术语)。如果您还没有分析 ID,请参见 介绍 Google Analytics 4 (GA4) 的 入门指南 部分。
Tip
Your project’s analytics ID is a string that starts withG- (a GA4
measurement ID) or UA- (a universal analytics property ID).设置
通过将项目的分析 ID 添加到站点配置文件中来启用 Google Analytics。有关详细信息,请参见Is services.googleAnalytics.id an alias for googleAnalytics.
Production-only feature!
Analytics are enabled only for production builds (called “environments” in Hugo terminology). For information about Hugo environments and how to set them, see the following discussion.用户反馈
默认情况下,Docsy 在每个文档页面底部放置一个"was this page helpful?“的反馈小部件,如图1所示。

点击"Yes"后,用户应该会看到类似图2的响应。您可以在项目的 [配置文件]
图2. 一个"Yes"响应的示例。
这些数据有什么用处?
当您有大量文档,且没有足够的时间更新所有文档时,您可以使用"was this page helpful?” 的反馈数据来帮助您决定哪些页面需要优先考虑。通常,从访问量高且评级低的页面开始。在此上下文中,“Low ratings"意味着用户更经常地点击No——页面不够有用——而不是Yes——页面有用。您还可以研究您评级高的页面,以制定关于为什么您的用户认为它们有用的假设。
一般来说,如果可能的话,您可以在文档中引入孤立的更改,以更加确定用户喜欢或不喜欢的模式。例如,假设您发现一个教程不再匹配产品。您更新了说明,一个月后再次检查,分数已经提高。现在您有了最新说明和更高评分之间的相关性。或者,假设您研究了高评分页面,并发现它们都以代码示例开头。您找到另外10个代码示例在底部的页面,将示例移动到顶部,发现每个页面的分数都有所提高。由于这是您在每个页面上引入的唯一更改,因此更有理由相信您的用户发现页面顶部的代码示例有帮助。换句话说,这是将科学方法应用于技术写作!
Setup 设置
Version note
As of Docsy version 0.8.0, feedback will be enabled whethersite.Config.Services.GoogleAnalytics.ID is set or not. This supports the use
case where analytics is configured outside of Docsy.Open your project’s Hugo configuration file.
Set the response text that users see after clicking Yes or No.
[params.ui.feedback] enable = true yes = 'Glad to hear it! Please <a href="https://github.com/USERNAME/REPOSITORY/issues/new">tell us how we can improve</a>.' no = 'Sorry to hear that. Please <a href="https://github.com/USERNAME/REPOSITORY/issues/new">tell us how we can improve</a>.'params: ui: feedback: enable: true 'yes': >- Glad to hear it! Please <a href="https://github.com/USERNAME/REPOSITORY/issues/new"> tell us how we can improve</a>. 'no': >- Sorry to hear that. Please <a href="https://github.com/USERNAME/REPOSITORY/issues/new"> tell us how we can improve</a>.{ "params": { "ui": { "feedback": { "enable": true, "yes": "Glad to hear it! Please <a href=\"<https://github.com/USERNAME/REPOSITORY/issues/new\">> tell us how we can improve</a>.", "no": "Sorry to hear that. Please <a href=\"<https://github.com/USERNAME/REPOSITORY/issues/new\">> tell us how we can improve</a>." } } } }Save the edits to your configuration file.
By default, Docsy emits an event value of 100 when a user clicks “yes”. You can
change this value by setting params.ui.feedback.max_value to a positive
integer. Docsy uses 0 for “no” events.
访问反馈数据
本节假设您基本熟悉Google Analytics。例如,您应该知道如何检查某个时间范围内的页面浏览量,并在访问多个文档站点的情况下在帐户之间导航。
Version note
As of Docsy version [0.8.0], page feedback is reported as custompage_helpful events,
rather than click events.- 打开 Google Analytics。
- 打开 Behavior > Events > Overview。
- 在Event Category表中点击 Helpful 行。如果看不到 Helpful 行,请点击view full report。
- 点击Event Label。现在您可以按页面对评级进行详细分类。
以下是这四列的含义:
- Total Events是用户点击 Yes 或 No 的总次数。
- Unique Events提供了一个粗略的指标,用于指示用户在每个会话中评价您的页面的频率。例如,假设您的Total Events为5000,而Unique Events为2500。这意味着您有 2500 个用户每个会话对 2 个页面进行评级。
- Event Value 并不是非常有用。
- Avg. Value 是该页面的聚合评级。该值始终在 0 和 1 之间。当用户点击 No 时,会发送值 0 到 Google Analytics。当用户点击 Yes 时,会发送值 1。您可以将其视为百分比。如果某个页面的 Avg. Value 为 0.67,则表示有 67% 的用户点击了 Yes,33% 的用户点击了 No。
存储"was this page helpful?“数据的基础 Google Analytics 基础架构称为事件(Events)。查看 docsy pull request #1 来了解用户单击 Yes 或 No 按钮时发生的确切事件。这只是一个click事件监听器,触发了 Google Analytics 的 JavaScript 函数来记录事件、禁用 Yes 和 No 按钮,并显示响应文本。
+++
hide_feedback = true
+++
---
hide_feedback: true
---{
"hide_feedback": true
}在单个页面上禁用反馈
在页面的前置元数据中添加 hide_feedback 参数并将其设置为 true。
[params.ui.feedback]
enable = falseparams:
ui:
feedback:
enable: false{
"params": {
"ui": {
"feedback": {
"enable": false
}
}
}
}在所有页面上禁用反馈
在 hugo.toml/hugo.yaml/hugo.json 中将 params.ui.feedback.enable 设置为 false:
<form action="https://fabform.io/f/{form-id}" method="post">
 <label for="email">Your Email</label>
 <input name="email" type="email">
 <button type="submit">Submit</button>
</form>
For more details, see Add a Hugo contact form in the Fabform documentation.
使用 Fabform 添加联系表单
您可以为您的站点创建一个联系表单,并在 fabform.io 上收集您的表单提交。要使用此功能,您首先需要在 Fabform 上注册一个帐户。以下示例显示如何将收集用户电子邮件地址的简单表单添加到您的站点源代码中:
<form action="https://fabform.io/f/{form-id}" method="post">
 <label for="email">Your Email</label>
 <input name="email" type="email">
 <button type="submit">Submit</button>
</form>
有关更多详细信息,请参见 Fabform 文档中的添加 Hugo 联系表单。
搜索引擎优化元标签
要了解如何优化您的站点以进行SEO,请参见Search Engine Optimization (SEO) Starter Guide
Googlerecommends使用description元标签告诉搜索引擎您的页面内容。对于每个生成的页面,Docsy将使用以下第一个定义的内容来设置元description的内容:
有关用于执行此计算的模板代码,请参见layouts/partials/page-description.html。
有关用于执行此计算的模板代码,请参见 layouts/partials/page-description.html。
根据需要向项目的 head-end.html partial 中添加更多的元标签。有关详情,请参见 自定义模板。
10 - 代码库链接及其页面信息
Docsy 文档和博客布局 包括让读者可以通过您的网站源代码仓库编辑页面或为您的文档或项目创建问题的链接。当前生成的每个文档或博客页面的链接如下:
- View page source:将用户带到您的文档存储库中的页面源代码。
- Edit this page:将用户带到页面内容的可编辑版本,位于他们的文档库复刻中(如果有的话)。如果用户没有您的文档库的当前 fork,则在进行编辑之前,将邀请他们创建一个 fork。然后,用户可以为您的文档创建拉取请求。
- Create child page:将用户带到在他们的文档库 fork 中创建新文件的表单中。新文件将作为他们单击链接页面的子级位置。该表单将使用一个模板进行预填,用户可以编辑此模板以创建自己的页面。您可以通过将
assets/stubs/new-page-template.md添加到您自己的项目中来更改此设置。 - Create documentation issue:将用户带到一个新的 issue 表单,在其中,当前页面的名称为该问题的标题。
- Create project issue(可选):将用户带到项目仓库中的一个新的issue 表单。如果您有单独的项目和文档存储库,并且您的用户想要针对正在讨论的项目功能提交问题,而不是针对您的文档,那么这可能很有用。
此页面向您展示了如何配置这些链接。
目前,Docsy仅支持GitHub存储库链接。由于GitLab可以处理相同的链接方案,因此也应该有效。如果您正在使用其他存储库(例如Bitbucket)并希望生成存储库链接,请随时 add a feature request or update our theme。
链接配置
在 hugo.toml/hugo.yaml/hugo.json 文件中,有四个变量可以配置以设置链接,同时在您的页面元数据中也有一个变量可以配置。
github_repo
您站点的源代码仓库的URL。此链接用于生成Edit this page、Create child page和Create documentation issue等链接。
[params]
github_repo = "https://github.com/google/docsy"params:
github_repo: https://github.com/google/docsy{
"params": {
"github_repo": "https://github.com/google/docsy"
}
}github_subdir (可选)
如果您的内容目录不在仓库的根目录中,请在此指定一个值。例如,此站点位于其仓库的 userguide 子目录中。设置此值意味着您的编辑链接将指向正确的页面。
[params]
github_subdir = "userguide"params:
github_subdir: userguide{
"params": {
"github_subdir": "userguide"
}
}github_project_repo (可选)
如果您有一个单独的项目仓库,希望您的用户能够从相关的文档中创建项目issues,请在此指定一个值。只有在设置了此项后,Create project issue链接才会显示。
[params]
github_project_repo = "https://github.com/google/docsy"params:
github_project_repo: https://github.com/google/docsy{
"params": {
"github_project_repo": "https://github.com/google/docsy"
}
}github_branch (可选)
如果您希望引用其他的 github 设置(如 Edit this page或 Create project issue)的不同分支,请在此指定一个值。
[params]
github_branch = "release"params:
github_branch: release{
"params": {
"github_branch": "release"
}
}path_base_for_github_subdir (可选)
假设 content/some-section 下的所有页面的源文件来自另一个仓库,例如git 子模块。在该章节的索引页中添加以下设置,以便该章节中的所有页面的存储库链接均指向源 仓库:
+++
title = "Some super section"
[cascade]
github_repo = "https://github.com/some-username/another-repo/"
github_subdir = "docs"
path_base_for_github_subdir = "content/some-section"
…
+++
---
title: Some super section
cascade:
github_repo: https://github.com/some-username/another-repo/
github_subdir: docs
path_base_for_github_subdir: content/some-section
…
---{
"title": "Some super section",
"cascade": {
"github_repo": "https://github.com/some-username/another-repo/",
"github_subdir": "docs",
"path_base_for_github_subdir": "content/some-section"
}
} 例如,考虑一个位于路径 content/some-section/subpath/some-page.md 的页面,全局 github_branch 设置为 main。上面的索引页面设置将为 some-page.md 生成以下编辑链接:
https://github.com/some-username/another-repo/edit/main/docs/subpath/some-page.md
如果您只有一个来自另一个仓库的页面,请省略 cascade 键,并编写与上面所示相同的顶级设置。
如果您希望用户也能在源仓库中创建项目问题,则还需设置 github_project_repo,例如:
---
...
cascade:
  github_repo: &repo https://github.com/some-username/another-repo/
  github_project_repo: *repo
...
---
+++
…
[cascade]
github_repo = "https://github.com/some-username/another-repo/"
github_project_repo = "https://github.com/some-username/another-repo/"
…
+++
---
…
cascade:
github_repo: &repo https://github.com/some-username/another-repo/
github_project_repo: *repo
…
---{
"cascade": {
"github_repo": "https://github.com/some-username/another-repo/",
"github_project_repo": "https://github.com/some-username/another-repo/"
}
}Tip
请注意,YAML 代码片段使用了 YAML 锚点。使用 YAML 锚点是可选的,但它有助于保持设置的 DRY(不重复自己)。 path_base_for_github_subdir 设置是一个正则表达式,因此即使您的站点包含 多个语言,您仍然可以使用它,例如:
+++
…
path_base_for_github_subdir = "content/\w+/some-section"
…
+++---
…
path_base_for_github_subdir: content/\w+/some-section
…
---{
…
"path_base_for_github_subdir": "content/\w+/some-section"
…
} 在某些情况下,页面来源于具有不同名称的文件,您可以指定 from 和 to 路径重命名设置。以下是一个例子,其中一个索引文件在来源仓库中命名为 README.md:
+++
…
github_repo = "https://github.com/some-username/another-repo/"
github_subdir = "docs"
[path_base_for_github_subdir]
from = "content/some-section/(.*?)/_index.md"
to = "$1/README.md"
…
+++---
…
github_repo: https://github.com/some-username/another-repo/
github_subdir: docs
path_base_for_github_subdir:
from: content/some-section/(.*?)/_index.md
to: $1/README.md
…
---{
…
"github_repo": "https://github.com/some-username/another-repo/",
"github_subdir": "docs",
"path_base_for_github_subdir": {
"from": "content/some-section/(.*?)/_index.md",
"to": "$1/README.md"
},
…
}github_url (可选)
Deprecation note
This setting is deprecated. Use path_base_for_github_subdir instead. 在您的页面元数据中指定此值以设置此页面的特定编辑 URL,例如以下示例:
+++
title = "Some page"
github_url = "https://github.com/some-username/another-repo/edit/main/README.md"
…
+++---
title: Some page
github_url: https://github.com/some-username/another-repo/edit/main/README.md
…
---{
"title": "Some page",
"github_url": "https://github.com/some-username/another-repo/edit/main/README.md",
…
} 如果您的页面源文件在多个 Git 存储库中,或需要非 GitHub URL,则可以使用此选项。使用此值的页面仅具有 Edit this page 链接。
禁用链接
您可以使用 CSS 有选择性地禁用(隐藏)链接。例如,将以下内容添加到 projects’s _styles_project.scss文件中,以从所有页面中隐藏 Create child page 链接:
.td-page-meta__child { display: none; }
| Link kind | Class name |
|---|---|
| View page source | .td-page-meta__view |
| Edit this page | .td-page-meta__edit |
| Create child page | .td-page-meta__child |
| Create documentation issue | .td-page-meta__issue |
| Create project issue | .td-page-meta__project-issue |
Of course, you can also use these classes to give repository links unique styles for your project.
上次修改的页面元数据
将页面源元数据显示在文档页面的底部,以及 博客文章中,将“GitInfo”配置参数设置为“true”,并确保定义了“params.github_repo”。
上次修改的页面注释如下所示:
Once enabled site-wide, you can selectively hide last-modified notes in a page
or section by declaring the following style (optionally with a !important
modifier — not shown):
.td-page-meta__lastmod { display: none; }
11 - 分类支持
Docsy支持Hugo的分类法(参见:https://gohugo.io/content-management/taxonomies/)用于文档和博客章节。您可以在此页面上查看默认布局,并测试生成的链接行为。
Terminology 术语
要理解分类法的用法,您应理解以下术语:
Taxonomy 分类法
可用于对内容进行分类的类别,例如:标签、分类、项目、人员。
Term 条目
分类法内的关键词,例如:在项目中:项目A、项目B。
Value 值
分配给条目的内容,例如:您站点上的页面,它属于特定的项目
在官方Hugo文档中可以找到一个电影站点的分类法示例:https://gohugo.io/content-management/taxonomies/#example-taxonomy-movie-website。
参数
有各种参数来控制项目配置文件中分类法的功能。
默认情况下,Hugo 中启用tags和categories的分类法(参见:https://gohugo.io/content-management/taxonomies/#default-taxonomies)。在 Docsy 中,默认情况下在 hugo.toml/hugo.yaml/hugo.json 中禁用分类法:
disableKinds = ["taxonomy", "taxonomyTerm"]disableKinds:
- taxonomy
- taxonomyTerm{
"disableKinds": [
"taxonomy",
"taxonomyTerm"
]
} 如果你想在Docsy中启用分类法,你需要在你的项目的 hugo.toml/hugo.yaml/hugo.json 文件中删除(或注释掉)这一行。然后Hugo将生成 tags 和 categories 的分类法页面。如果你想使用其他分类法,你需要在你的配置文件中定义它们。如果你想同时使用自己的分类法和默认的 tags 和 categories 分类法,你还需要除了你自己的分类法外定义它们。你需要为每个分类法提供复数和单数标签。
通过以下示例,你可以定义一个名为 projects 的额外分类法,除了默认的 tags 和 categories 分类法之外:
[taxonomies]
tag = "tags"
category = "categories"
project = "projects"taxonomies:
tag: tags
category: categories
project: projects{
"taxonomies": {
"tag": "tags",
"category": "categories",
"project": "projects"
}
} 你可以在你项目的 hugo.toml/hugo.yaml/hugo.json 中使用以下参数来控制在Docsy中为每篇文章或页面分配的分类法条目的输出,或在Docsy的右侧边栏中显示"标签云":
[params.taxonomy]
taxonomyCloud = ["projects", "tags"] # set taxonomyCloud = [] to hide taxonomy clouds
taxonomyCloudTitle = ["Our Projects", "Tag Cloud"] # if used, must have same length as taxonomyCloud
taxonomyPageHeader = ["tags", "categories"] # set taxonomyPageHeader = [] to hide taxonomies on the page headersparams:
taxonomy:
taxonomyCloud:
- projects # remove all entries
- tags # to hide taxonomy clouds
taxonomyCloudTitle: # if used, must have the same
- Our Projects # number of entries as taxonomyCloud
- Tag Cloud
taxonomyPageHeader:
- tags # remove all entries
- categories # to hide taxonomy clouds{
"params": {
"taxonomy": {
"taxonomyCloud": [
"projects",
"tags"
],
"taxonomyCloudTitle": [
"Our Projects",
"Tag Cloud"
],
"taxonomyPageHeader": [
"tags",
"categories"
]
}
}
} 以上设置仅在Docsy的右侧边栏中显示 projects 和 tags 的分类法云(分别带有"Our Projects"和"Tag Cloud"标题),以及每个页面的分类法 tags 和 categories 的分配条目。
要禁用任何分类法云,你需要设置参数 taxonomyCloud = []。如果你不想显示分配的条目,你需要设置 taxonomyPageHeader = []。
默认情况下,一个分类法的复数标签被用作云标题。你可以使用 taxonomyCloudTitle 覆盖默认的云标题。但是如果你这样做了,你必须为每个启用的分类法云定义一个手动标题(taxonomyCloud 和 taxonomyCloudTitle 必须具有相同的长度!)。
如果您没有设置参数 taxonomyCloud 或 taxonomyPageHeader,则会生成所有定义的分类法的分类云或分配术语。
Partials 局部
默认使用的partials用于显示分类法,因此定义它们时您应该也能够在自己的布局中轻松使用它们。
taxonomy_terms_article
partial taxonomy_terms_article 显示给定文章或页面的给定分类法(partial参数 taxo)的所有分配术语(partial参数 context,大多数情况下是当前页面或上下文 .)。
在 layouts/docs/list.html 中示例用法,用于文档章节中每个页面的标题:
{{ $context := . }}
{{ range $taxo, $taxo_map := .Site.Taxonomies }}
{{ partial "taxonomy_terms_article.html" (dict "context" $context "taxo" $taxo ) }}
{{ end }}
对于当前页面(或上下文(resp. context))中定义的每个分类法,这将为您提供一个列出所有已分配术语的列表:
<div class="taxonomy taxonomy-terms-article taxo-categories">
<h5 class="taxonomy-title">Categories:</h5>
<ul class="taxonomy-terms">
<li><a class="taxonomy-term" href="//localhost:1313/categories/taxonomies/" data-taxonomy-term="taxonomies"><span class="taxonomy-label">Taxonomies</span></a></li>
</ul>
</div>
<div class="taxonomy taxonomy-terms-article taxo-tags">
<h5 class="taxonomy-title">Tags:</h5>
<ul class="taxonomy-terms">
<li><a class="taxonomy-term" href="//localhost:1313/tags/tagging/" data-taxonomy-term="tagging"><span class="taxonomy-label">Tagging</span></a></li>
<li><a class="taxonomy-term" href="//localhost:1313/tags/structuring-content/" data-taxonomy-term="structuring-content"><span class="taxonomy-label">Structuring Content</span></a></li>
<li><a class="taxonomy-term" href="//localhost:1313/tags/labelling/" data-taxonomy-term="labelling"><span class="taxonomy-label">Labelling</span></a></li>
</ul>
</div>
taxonomy_terms_article_wrapper
partial taxonomy_terms_article_wrapper 是部分 taxonomy_terms_article 的包装器,仅带有参数 context(大多数情况下是当前页面或上下文(context ) .),并检查您的项目的 hugo.toml / hugo.yaml / hugo.json 的分类法参数,以循环遍历参数 taxonomyPageHeader 的所有列出的分类法或页面的所有定义的分类法,如果未设置 taxonomyPageHeader。
taxonomy_terms_cloud
partial taxonomy_terms_cloud 显示站点(部分参数 context,大多数情况下是当前页面或上下文 .)给定分类法(partial 参数 taxo)的所有使用术语,并使用参数 title 作为标题。
在partial taxonomy_terms_clouds 中示例用法,用于显示所有定义的分类法及其术语:
{{ $context := . }}
{{ range $taxo, $taxo_map := .Site.Taxonomies }}
{{ partial "taxonomy_terms_cloud.html" (dict "context" $context "taxo" $taxo "title" ( humanize $taxo ) ) }}
{{ end }}
例如,这将为分类法 categories 提供以下 HTML 标记:
<div class="taxonomy taxonomy-terms-cloud taxo-categories">
<h5 class="taxonomy-title">Cloud of Categories</h5>
<ul class="taxonomy-terms">
<li><a class="taxonomy-term" href="//localhost:1313/categories/category-1/" data-taxonomy-term="category-1"><span class="taxonomy-label">category 1</span><span class="taxonomy-count">3</span></a></li>
<li><a class="taxonomy-term" href="//localhost:1313/categories/category-2/" data-taxonomy-term="category-2"><span class="taxonomy-label">category 2</span><span class="taxonomy-count">1</span></a></li>
<li><a class="taxonomy-term" href="//localhost:1313/categories/category-3/" data-taxonomy-term="category-3"><span class="taxonomy-label">category 3</span><span class="taxonomy-count">2</span></a></li>
<li><a class="taxonomy-term" href="//localhost:1313/categories/category-4/" data-taxonomy-term="category-4"><span class="taxonomy-label">category 4</span><span class="taxonomy-count">6</span></a></li>
</ul>
</div>
taxonomy_terms_clouds
partial taxonomy_terms_clouds 是partial taxonomy_terms_cloud 的包装器,仅带有参数 context(大多数情况下是当前页面或上下文 .),并检查您的项目的 hugo.toml / hugo.yaml / hugo.json 的分类法参数,以循环遍历参数 taxonomyCloud 的所有列出的分类法或页面的所有定义的分类法,如果未设置 taxonomyCloud。
分类法的多语言支持
与分类法条目相关的内容只在相同语言内进行计数和链接!分类法支持的控制参数也可以分配给特定的语言。
12 - 图表和公式
Docsy内置了对许多图表创建和排版工具的支持,您可以使用这些工具向网站添加丰富的内容,包括(KaTeX),Mermaid,Diagrams.net,PlantUML和MarkMap。
\(\LaTeX\) 支持 \(\KaTeX\)
\(\LaTeX\) 是用于制作技术和科学文献的高质量排版系统。由于其出色的数学排版能力, \(\TeX\) 成为科学文件交流和出版的事实标准,特别是如果这些文件包含大量数学公式。最初版本由唐纳德·克努斯(Donald Knuth)设计和编写,于1978年发布。追溯到那么远, \(\LaTeX\) 将“pdf”作为其主要输出目标,并且不是特别适合为 Web 生成 HTML 输出。幸运的是,有了 \(\KaTeX\) 网络上有一个快速且易于使用的 JavaScript 库,用于 \(\TeX\) 数学渲染,该库已集成到 Docsy 主题中。
借助 Docsy 中的 \(\KaTeX\) 支持 [enabled](#activating-and-configuring-katex-support),您可以将复杂的数学公式包含在您的网页中,无论是内联的还是以自己的行为中心的。由于 \(\KaTeX\) 依赖于服务器端渲染,因此无论您的浏览器或环境如何,它都会生成相同的输出。公式可以内联显示,也可以显示模式:
内联公式
下面的代码示例生成一个包含三个内联公式的文本行:
When \\(a \ne 0\\), there are two solutions to \\(ax^2 + bx + c= 0\\) and they are \\(x = {-b \pm \sqrt{b^2-4ac} \over 2a}\\).
When \(a \ne 0\), there are two solutions to \(ax^2 + bx + c= 0\) and they are \(x = {-b \pm \sqrt{b^2-4ac} \over 2a}\).
显示模式下的公式
下面的代码示例生成一个介绍性文本行,后跟一个编号为“(1)”的公式,该公式位于其自己的行上:
The probability of getting \\(k\\) heads when flipping \\(n\\) coins is:
```math
\tag*{(1)} P(E) = {n \choose k} p^k (1-p)^{n-k}
```
公式本身写在 [GLFM 数学块](https://docs.gitlab.com/ee/user/markdown.html#math) 中。上面的代码片段呈现为:
掷硬币时得到 \(k\) 个正面的概率为:
Warning
math code blocks are only supported as of hugo version 0.93.
In case of hugo version 0.92 or lower, use this code snippet to display the formula:
$$
\tag*{(1)} P(E) = {n \choose k} p^k (1-p)^{n-k}
$$
Tip
This wiki page provides in-depth information about typesetting mathematical formulae using the \(\LaTeX\) typesetting system.
此 [wiki 页面](https://en.wikibooks.org/wiki/LaTeX/Mathematics) 提供有关使用 \(\LaTeX\) 排版系统排版数学公式的深入信息。
激活和配置 \(\KaTeX\) 支持
自动激活
只要您在页面上使用“math”代码块,就会自动启用对 \(\KaTeX\) 的支持。
手动激活(不存在“math”代码块或 hugo 0.92 或更低)
如果您想使用内联公式,并且页面中没有触发自动激活的“数学”代码块,则需要手动激活 \(\KaTeX\) 支持。最简单的方法是在页面的首页添加一个“math”属性,并将其设置为“true”:
+++
math = true
+++---
math: true
---{
"math": true
}如果你在大多数页面中使用公式,你还可以在Docsy主题中启用全站的 \(\KaTeX\) 支持。为此,请更新 ‘hugo.toml’/‘hugo.yaml’/‘hugo.json’:
[params.katex]
enable = trueparams:
katex:
enable: true{
"params": {
"katex": {
"enable": true
}
}
}此外,如果需要,您可以在 ‘hugo.toml’/‘hugo.yaml’/‘hugo.json’ 中自定义各种 \(\KaTeX\) 选项:
[params.katex]
# enable/disable KaTeX support
enable = true
# Element(s) scanned by auto render extension. Default: document.body
html_dom_element = "document.body"
[params.katex.options]
# If true (the default), KaTeX will throw a ParseError when it encounters an
# unsupported command or invalid LaTeX. If false, KaTeX will render unsupported
# commands as text, and render invalid LaTeX as its source code with hover text
# giving the error, in the color given by errorColor.
throwOnError = false
errorColor = "#CD5C5C"
# This is a list of delimiters to look for math, processed in the same order as
# the list. Each delimiter has three properties:
# left: A string which starts the math expression (i.e. the left delimiter).
# right: A string which ends the math expression (i.e. the right delimiter).
# display: Whether math in the expression should be rendered in display mode.
[[params.katex.options.delimiters]]
left = "$$"
right = "$$"
display = true
[[params.katex.options.delimiters]]
left = "$"
right = "$"
display = false
[[params.katex.options.delimiters]]
left = "\\("
right = "\\)"
display = false
[[params.katex.options.delimiters]]
left = "\\["
right = "\\]"
display = trueparams:
katex:
enable: true # enable/disable KaTeX support
html_dom_element: document.body # Element(s) scanned by auto render extension. Default: document.body
options:
# If true (the default), KaTeX will throw a ParseError when it encounters an
# unsupported command or invalid LaTeX. If false, KaTeX will render unsupported
# commands as text, and render invalid LaTeX as its source code with hover text
# giving the error, in the color given by errorColor.
throwOnError: false
errorColor: '#CD5C5C'
# This is a list of delimiters to look for math, processed in the same order as
# the list. Each delimiter has three properties:
# left: A string which starts the math expression (i.e. the left delimiter).
# right: A string which ends the math expression (i.e. the right delimiter).
# display: Whether math in the expression should be rendered in display mode.
delimiters:
- left: $$
right: $$
display: true
- left: $
right: $
display: false
- left: \(
right: \)
display: false
- left: \[
right: \]
display: true{
"params": {
"katex": {
"enable": true,
"html_dom_element": "document.body",
"options": {
"throwOnError": false,
"errorColor": "#CD5C5C",
"delimiters": [
{
"left": "$$",
"right": "$$",
"display": true
},
{
"left": "$",
"right": "$",
"display": false
},
{
"left": "\\(",
"right": "\\)",
"display": false
},
{
"left": "\\[",
"right": "\\]",
"display": true
}
]
}
}
}
}有关选项的完整列表及其详细说明,请查看 \({\KaTeX}\) 的 [Rendering API options](https://katex.org/docs/autorender.html#api) 和 \({\KaTeX}\) 的 [configuration options](https://katex.org/docs/options.html) 的文档。
显示化学方程式和物理单位
[mhchem](https://www.ctan.org/pkg/mhchem) 是一个 \(\LaTeX\) 包,用于排版化学分子式和方程式。幸运的是,\(\KaTeX\) 提供了 ‘mhchem’ [extension](https://github.com/KaTeX/KaTeX/tree/main/contrib/mhchem),使 ‘mhchem’ 包在为 Web 创作内容时可以访问。使用“mhchem”扩展 [enabled](#activating-rendering-support-for-chemical-formulae),您可以轻松地将化学方程式包含在您的页面中。方程可以内联显示,也可以驻留在自己的行上。下面的代码示例生成一个包含化学方程式的文本行:
*Precipitation of barium sulfate:* \\(\ce{SO4^2- + Ba^2+ -> BaSO4 v}\\)
Precipitation of barium sulfate: \(\ce{SO4^2- + Ba^2+ -> BaSO4 v}\)
更复杂的方程需要显示在自己的行上。使用装饰有“chem”的代码块来实现这一点:
```chem
\tag*{(2)} \ce{Zn^2+ <=>[+ 2OH-][+ 2H+] $\underset{\text{amphoteric hydroxide}}{\ce{Zn(OH)2 v}}$ <=>[+ 2OH-][+ 2H+] $\underset{\text{tetrahydroxozincate}}{\ce{[Zn(OH)4]^2-}}$}
```
Warning
‘chem’ 代码块仅在 Hugo 版本 0.93 中受支持。
如果 hugo 版本为 0.92 或更低版本,请使用以下代码片段显示公式:
$$
\tag*{(2)} \ce{Zn^2+ <=>[+ 2OH-][+ 2H+] $\underset{\text{amphoteric hydroxide}}{\ce{Zn(OH)2 v}}$ <=>[+ 2OH-][+ 2H+] $\underset{\text{tetrahydroxozincate}}{\ce{[Zn(OH)4]^2-}}$}
$$
Note
mchem 输入语法的 [manual](https://mhchem.github.io/MathJax-mhchem/) 提供了有关使用“mhchem”工具排版化学式和物理单位的深入信息。mhchem 的使用不仅限于编写化学方程式,使用包含的 \pu命令,也可以轻松编写漂亮的物理单位。下面的代码示例生成两个文本行,其中包含四个数字及其对应的物理单位:
* Scientific number notation: \\(\pu{1.2e3 kJ}\\) or \\(\pu{1.2E3 kJ}\\) \\
* Divisions: \\(\pu{123 kJ/mol}\\) or \\(\pu{123 kJ//mol}\\)
- Scientific number notation: \(\pu{1.2e3 kJ}\) or \(\pu{1.2E3 kJ}\)
- Divisions: \(\pu{123 kJ/mol}\) or \(\pu{123 kJ//mol}\)
有关创作物理单位时的完整选项列表,请查看“mhchem”文档中关于物理单位的 [section](https://mhchem.github.io/MathJax-mhchem/#pu)。
激活对化学式的渲染支持
自动激活
只要您在页面上使用“chem”代码块,就会自动启用对化学方程式的渲染支持。
手动激活(不存在“化学”代码块或 hugo 0.92 或更低)
如果要内联使用化学式,并且页面中没有触发自动激活的“chem”代码块,则需要手动激活对化学式呈现支持。最简单的方法是在页面的 frontmatter 中添加一个 ‘chem’ 属性,并将其设置为 ’true’:
+++
chem = true
+++---
chem: true
---{
"chem": true
}如果您在大多数页面中使用公式,您还可以在 Docsy 主题中启用对化学公式的全站渲染支持。为此,请在“hugo.toml”/“hugo.yaml”/“hugo.json”中启用“mhchem”:
[params.katex]
enable = true
[params.katex.mhchem]
enable = trueparams:
katex:
enable: true
mhchem:
enable: true{
"params": {
"katex": {
"enable": true,
"mhchem": {
"enable": true
}
}
}
}美人鱼图
[美人鱼](https://mermaid-js.github.io) 是一个 Javascript 库,用于在浏览器中将简单的文本定义呈现为有用的图表。 它可以生成各种不同的图表类型,包括流程图、序列图、类图、状态图、ER 图、用户旅程图、甘特图和饼图。
在 Docsy 中启用 Mermaid 支持后,您可以在代码块中包含 Mermaid 图表的文本定义,并且浏览器将在页面加载后立即自动呈现它。
这样做的最大好处是,任何可以编辑页面的人现在都可以编辑图表 - 不再需要寻找原始工具和版本来进行新的编辑。
例如,下面定义了一个序列图:
```mermaid
sequenceDiagram
autonumber
Docsy user->>Discussion board: Ask question
Discussion board->>Community member: read question
loop Different strategies
Community member->>Test instance: Investigate issue raised
end
Note right of Community member: After hours of investigation:
Test instance-->>Community member: Come up with solution
Community member-->>Discussion board: Propose solution
Discussion board-->>Docsy user: check proposed solution
Docsy user->>Discussion board: Mark question as resolved
Docsy user->>Docsy user: Being happy
```
它会自动呈现为:
sequenceDiagram
autonumber
Docsy user->>Discussion board: Ask question
Discussion board->>Community member: read question
loop Different strategies
Community member->>Test instance: Investigate issue raised
end
Note right of Community member: After hours of investigation:
Test instance-->>Community member: Come up with solution
Community member-->>Discussion board: Propose solution
Discussion board-->>Docsy user: check proposed solution
Docsy user->>Discussion board: Mark question as resolved
Docsy user->>Docsy user: Being happy一旦您在页面上使用“美人鱼”代码块,就会自动启用对美人鱼图的支持。
默认情况下,docsy 会在构建时拉入最新的官方发布的 Mermaid 版本。如果这不符合您的需求,您可以在配置文件 ‘hugo.toml’/‘hugo.yaml’/‘hugo.json’ 中指定通缉的美人鱼版本:
[params.mermaid]
version = "10.9.0"params:
mermaid:
version: 10.9.0{
"params": {
"mermaid": {
"version": "10.9.0"
}
}
}如果需要,您可以为图表定义自定义设置,例如主题,在“hugo.toml”/“hugo.yaml”/“hugo.json”中填充。
[params.mermaid]
theme = "neutral"
[params.mermaid.flowchart]
diagramPadding = 6params:
mermaid:
theme: neutral
flowchart:
diagramPadding: 6{
"params": {
"mermaid": {
"theme": "neutral",
"flowchart": {
"diagramPadding": 6
}
}
}
}请参阅 [Mermaid 文档](https://mermaid-js.github.io/mermaid/#/Setup?id=mermaidapi-configuration-defaults) 了解可覆盖的默认值列表。
还可以通过在逻辑示意图定义的开头使用 [frontmatter config](http://mermaid.js.org/config/theming.html#customizing-themes-with-themevariables) 块来覆盖每个逻辑示意图的设置。
带有PlantUML的UML图
[植物UML](https://plantuml.com/en/) 是 Mermaid 的替代品,可让您快速创建 UML 图,包括序列图、用例图和状态图。与完全在浏览器中呈现的美人鱼图不同,PlantUML 使用 PlantUML 服务器来创建图。您可以使用提供的默认演示服务器(不建议用于生产用途),也可以自行运行服务器。PlantUML 提供的图像类型比 Mermaid 更广泛,因此对于某些用例来说可能是更好的选择。
图表是使用简单直观的语言定义的。([参见 PlantUML 语言参考指南](https://plantuml.com/en/guide))。
以下示例显示了一个用例图:
```plantuml
participant participant as Foo
actor actor as Foo1
boundary boundary as Foo2
control control as Foo3
entity entity as Foo4
database database as Foo5
collections collections as Foo6
queue queue as Foo7
Foo -> Foo1 : To actor
Foo -> Foo2 : To boundary
Foo -> Foo3 : To control
Foo -> Foo4 : To entity
Foo -> Foo5 : To database
Foo -> Foo6 : To collections
Foo -> Foo7: To queue
```
自动呈现为:
participant participant as Foo
actor actor as Foo1
boundary boundary as Foo2
control control as Foo3
entity entity as Foo4
database database as Foo5
collections collections as Foo6
queue queue as Foo7
Foo -> Foo1 : To actor
Foo -> Foo2 : To boundary
Foo -> Foo3 : To control
Foo -> Foo4 : To entity
Foo -> Foo5 : To database
Foo -> Foo6 : To collections
Foo -> Foo7: To queue
要启用/禁用 PlantUML,请更新 ‘hugo.toml’/‘hugo.yaml’/‘hugo.json’:
[params.plantuml]
enable = trueparams:
plantuml:
enable: true{
"params": {
"plantuml": {
"enable": true
}
}
}其他可选设置包括:
[params.plantuml]
enable = true
theme = "default"
# Set url to plantuml server
# default is http://www.plantuml.com/plantuml/svg/
svg_image_url = "https://www.plantuml.com/plantuml/svg/"
# By default the plantuml implementation uses <img /> tags to display UML diagrams.
# When svg is set to true, diagrams are displayed using <svg /> tags, maintaining functionality like links e.g.
# default = false
svg = trueparams:
plantuml:
enable: true
theme: default
# Set url to plantuml server
# default is http://www.plantuml.com/plantuml/svg/
svg_image_url: 'https://www.plantuml.com/plantuml/svg/'
# By default the plantuml implementation uses <img /> tags to display UML diagrams.
# When svg is set to true, diagrams are displayed using <svg /> tags, maintaining functionality like links e.g.
# default = false
svg: true{
"params": {
"plantuml": {
"enable": true,
"theme": "default",
"svg_image_url": "https://www.plantuml.com/plantuml/svg/",
"svg": true
}
}
}MarkMap 支持 MindMap
[标记地图](https://markmap.js.org/) 是一个 Javascript 库,用于在浏览器中将简单的文本定义呈现给思维导图。
例如,下面定义了一个简单的思维导图:
```markmap
# markmap
## Links
- <https://markmap.js.org/>
- [GitHub](https://github.com/gera2ld/markmap)
## Related
- [coc-markmap](https://github.com/gera2ld/coc-markmap)
- [gatsby-remark-markmap](https://github.com/gera2ld/gatsby-remark-markmap)
## Features
- links
- **inline** ~~text~~ *styles*
- multiline
text
- `inline code`
-
```js
console.log('code block');
```
- Katex - $x = {-b \pm \sqrt{b^2-4ac} \over 2a}$
```
自动呈现为:
# markmap
## Links
- <https://markmap.js.org/>
- [GitHub](https://github.com/gera2ld/markmap)
## Related
- [coc-markmap](https://github.com/gera2ld/coc-markmap)
- [gatsby-remark-markmap](https://github.com/gera2ld/gatsby-remark-markmap)
## Features
- links
- **inline** ~~text~~ *styles*
- multiline
text
- `inline code`
-
```js
console.log('code block');
```
- Katex - $x = {-b \pm \sqrt{b^2-4ac} \over 2a}$
要启用/禁用 MarkMap,请更新 ‘hugo.toml’/‘hugo.yaml’/‘hugo.json’:
[params.markmap]
enable = trueparams:
markmap:
enable: true{
"params": {
"markmap": {
"enable": true
}
}
}带有 Diagrams.net 的图表
[Diagrams.net](https://diagrams.net/)(又名“draw.io”)提供了一个免费的开源图表编辑器,可以使用 Web 或桌面编辑器生成比 Mermaid 或 PlantUML 更广泛的图表。
默认情况下,使用该工具导出的 SVG 和 PNG 文件包含原始图表的源代码,这允许 diagrams.net 站点再次导入这些图像以供将来编辑。启用“draw.io”后,Docsy将检测到这一点,并自动在可以使用在线网站编辑的任何图像上添加“编辑”按钮。
将鼠标悬停在下面的图像上,然后单击编辑以立即开始使用它。 单击“保存”按钮将导致使用相同的文件名和文件类型导出编辑后的图表,并下载到您的浏览器。
Note
If you’re creating a new diagram, be sure toFile -> Export in either svg or png format (svg is usually the best choice) and ensure the Include a copy of my diagram is selected so it can be edited again later.由于图表数据是通过浏览器传输的,因此 diagrams.net 服务器根本不需要直接访问Docsy服务器上的内容。

Mouse over the above image and click the Edit button!
要启用图表检测,请更新 ‘hugo.toml’/‘hugo.yaml’/‘hugo.json’:
[params.drawio]
enable = trueparams:
drawio:
enable: true{
"params": {
"drawio": {
"enable": true
}
}
}您还可以 [部署和使用您自己的服务器](https://github.com/jgraph/docker-drawio/blob/master/README.md) 来编辑图表,在这种情况下,请更新配置以指向该服务器:
[params.drawio]
drawio_server = "https://app.mydrawioserver.example.com"params:
drawio:
drawio_server: 'https://app.mydrawioserver.example.com'{
"params": {
"drawio": {
"drawio_server": "https://app.mydrawioserver.example.com"
}
}
}