Version main of the documentation is no longer actively maintained. The site that you are currently viewing is an archived snapshot. For up-to-date documentation, see the latest version.
分析、用户反馈和SEO
添加分析
Docsy 主题基于 Hugo 对 Google Analytics 的支持,Hugo 通过 内部模板 提供支持。一旦您按照下面的说明设置了分析,您的网站使用信息(如页面浏览量)将发送到您的 Google Analytics 账户。
先决条件
在继续之前,您需要为您的网站获取一个 分析 ID(技术上称为测量 ID 或属性 ID,但在本指南中我们将使用"analytics ID(分析 ID)“这个术语)。如果您还没有分析 ID,请参见 介绍 Google Analytics 4 (GA4) 的 入门指南 部分。
Tip
Your project’s analytics ID is a string that starts withG- (a GA4
measurement ID) or UA- (a universal analytics property ID).设置
通过将项目的分析 ID 添加到站点配置文件中来启用 Google Analytics。有关详细信息,请参见Is services.googleAnalytics.id an alias for googleAnalytics.
Production-only feature!
Analytics are enabled only for production builds (called “environments” in Hugo terminology). For information about Hugo environments and how to set them, see the following discussion.用户反馈
默认情况下,Docsy 在每个文档页面底部放置一个"was this page helpful?“的反馈小部件,如图1所示。

点击"Yes"后,用户应该会看到类似图2的响应。您可以在项目的 [配置文件]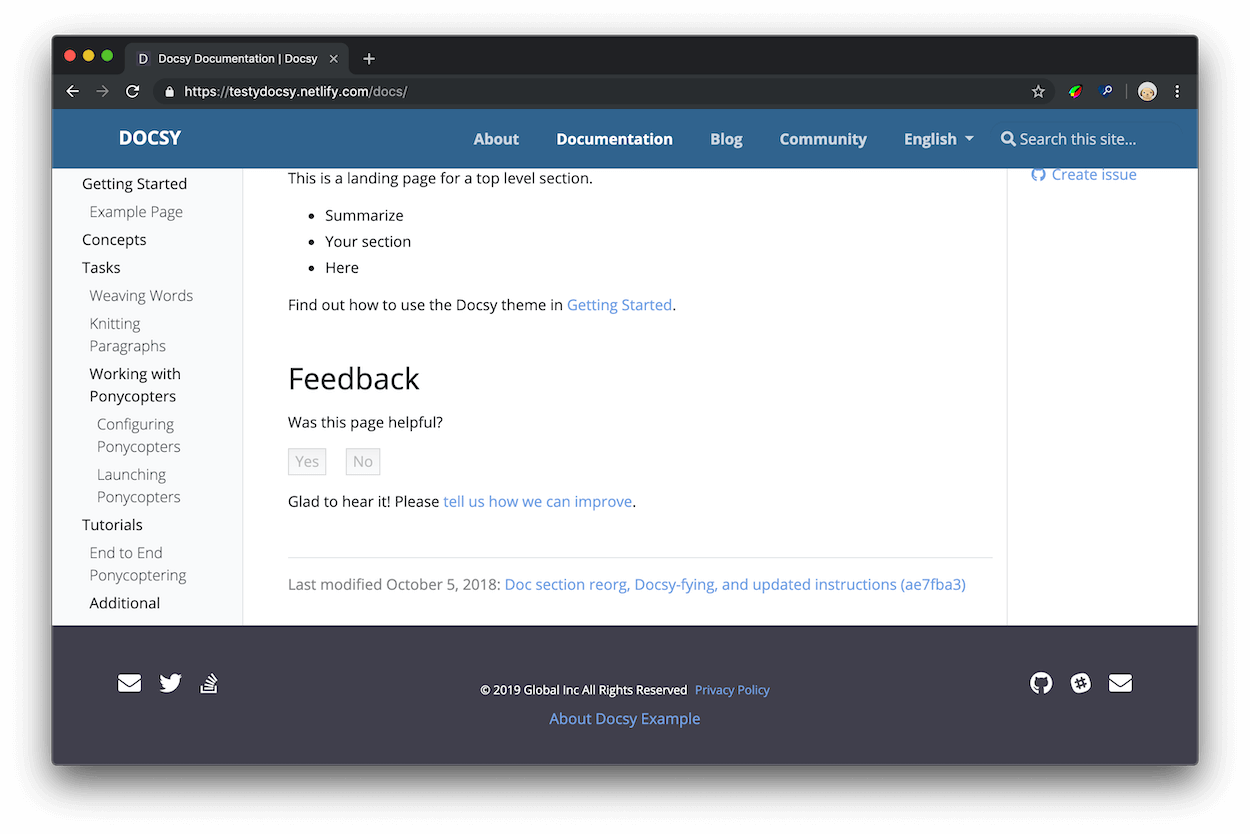
图2. 一个"Yes"响应的示例。
这些数据有什么用处?
当您有大量文档,且没有足够的时间更新所有文档时,您可以使用"was this page helpful?” 的反馈数据来帮助您决定哪些页面需要优先考虑。通常,从访问量高且评级低的页面开始。在此上下文中,“Low ratings"意味着用户更经常地点击No——页面不够有用——而不是Yes——页面有用。您还可以研究您评级高的页面,以制定关于为什么您的用户认为它们有用的假设。
一般来说,如果可能的话,您可以在文档中引入孤立的更改,以更加确定用户喜欢或不喜欢的模式。例如,假设您发现一个教程不再匹配产品。您更新了说明,一个月后再次检查,分数已经提高。现在您有了最新说明和更高评分之间的相关性。或者,假设您研究了高评分页面,并发现它们都以代码示例开头。您找到另外10个代码示例在底部的页面,将示例移动到顶部,发现每个页面的分数都有所提高。由于这是您在每个页面上引入的唯一更改,因此更有理由相信您的用户发现页面顶部的代码示例有帮助。换句话说,这是将科学方法应用于技术写作!
Setup 设置
Version note
As of Docsy version 0.8.0, feedback will be enabled whethersite.Config.Services.GoogleAnalytics.ID is set or not. This supports the use
case where analytics is configured outside of Docsy.Open your project’s Hugo configuration file.
Set the response text that users see after clicking Yes or No.
[params.ui.feedback] enable = true yes = 'Glad to hear it! Please <a href="https://github.com/USERNAME/REPOSITORY/issues/new">tell us how we can improve</a>.' no = 'Sorry to hear that. Please <a href="https://github.com/USERNAME/REPOSITORY/issues/new">tell us how we can improve</a>.'params: ui: feedback: enable: true 'yes': >- Glad to hear it! Please <a href="https://github.com/USERNAME/REPOSITORY/issues/new"> tell us how we can improve</a>. 'no': >- Sorry to hear that. Please <a href="https://github.com/USERNAME/REPOSITORY/issues/new"> tell us how we can improve</a>.{ "params": { "ui": { "feedback": { "enable": true, "yes": "Glad to hear it! Please <a href=\"<https://github.com/USERNAME/REPOSITORY/issues/new\">> tell us how we can improve</a>.", "no": "Sorry to hear that. Please <a href=\"<https://github.com/USERNAME/REPOSITORY/issues/new\">> tell us how we can improve</a>." } } } }Save the edits to your configuration file.
By default, Docsy emits an event value of 100 when a user clicks “yes”. You can
change this value by setting params.ui.feedback.max_value to a positive
integer. Docsy uses 0 for “no” events.
访问反馈数据
本节假设您基本熟悉Google Analytics。例如,您应该知道如何检查某个时间范围内的页面浏览量,并在访问多个文档站点的情况下在帐户之间导航。
Version note
As of Docsy version [0.8.0], page feedback is reported as custompage_helpful events,
rather than click events.- 打开 Google Analytics。
- 打开 Behavior > Events > Overview。
- 在Event Category表中点击 Helpful 行。如果看不到 Helpful 行,请点击view full report。
- 点击Event Label。现在您可以按页面对评级进行详细分类。
以下是这四列的含义:
- Total Events是用户点击 Yes 或 No 的总次数。
- Unique Events提供了一个粗略的指标,用于指示用户在每个会话中评价您的页面的频率。例如,假设您的Total Events为5000,而Unique Events为2500。这意味着您有 2500 个用户每个会话对 2 个页面进行评级。
- Event Value 并不是非常有用。
- Avg. Value 是该页面的聚合评级。该值始终在 0 和 1 之间。当用户点击 No 时,会发送值 0 到 Google Analytics。当用户点击 Yes 时,会发送值 1。您可以将其视为百分比。如果某个页面的 Avg. Value 为 0.67,则表示有 67% 的用户点击了 Yes,33% 的用户点击了 No。
存储"was this page helpful?“数据的基础 Google Analytics 基础架构称为事件(Events)。查看 docsy pull request #1 来了解用户单击 Yes 或 No 按钮时发生的确切事件。这只是一个click事件监听器,触发了 Google Analytics 的 JavaScript 函数来记录事件、禁用 Yes 和 No 按钮,并显示响应文本。
+++
hide_feedback = true
+++
---
hide_feedback: true
---{
"hide_feedback": true
}在单个页面上禁用反馈
在页面的前置元数据中添加 hide_feedback 参数并将其设置为 true。
[params.ui.feedback]
enable = falseparams:
ui:
feedback:
enable: false{
"params": {
"ui": {
"feedback": {
"enable": false
}
}
}
}在所有页面上禁用反馈
在 hugo.toml/hugo.yaml/hugo.json 中将 params.ui.feedback.enable 设置为 false:
<form action="https://fabform.io/f/{form-id}" method="post">
 <label for="email">Your Email</label>
 <input name="email" type="email">
 <button type="submit">Submit</button>
</form>
For more details, see Add a Hugo contact form in the Fabform documentation.
使用 Fabform 添加联系表单
您可以为您的站点创建一个联系表单,并在 fabform.io 上收集您的表单提交。要使用此功能,您首先需要在 Fabform 上注册一个帐户。以下示例显示如何将收集用户电子邮件地址的简单表单添加到您的站点源代码中:
<form action="https://fabform.io/f/{form-id}" method="post">
 <label for="email">Your Email</label>
 <input name="email" type="email">
 <button type="submit">Submit</button>
</form>
有关更多详细信息,请参见 Fabform 文档中的添加 Hugo 联系表单。
搜索引擎优化元标签
要了解如何优化您的站点以进行SEO,请参见Search Engine Optimization (SEO) Starter Guide
Googlerecommends使用description元标签告诉搜索引擎您的页面内容。对于每个生成的页面,Docsy将使用以下第一个定义的内容来设置元description的内容:
有关用于执行此计算的模板代码,请参见layouts/partials/page-description.html。
有关用于执行此计算的模板代码,请参见 layouts/partials/page-description.html。
根据需要向项目的 head-end.html partial 中添加更多的元标签。有关详情,请参见 自定义模板。